
06-RocketMQ网络通信源码
| 版本 | 内容 | 时间 |
|---|---|---|
| V1 | 新建 | 2022年08月01日23:20:55 |
| V2 | 重构 | 2023年06月09日00:55:20 |
| V3 | 新增图片 | 2023年06月09日23:35:13 |
本章分析流程
- 分析通信相关类的继承关系,和它们提供的 API;
- 分析 RocketMQ 的消息协议设计和编解码;
- 分析发送同步消息、异步消息和单向消息的流程,包括双端是如何处理的;
- 分析如何处理超时的那些请求;
通信相关类的继承图
接口和抽象类分析
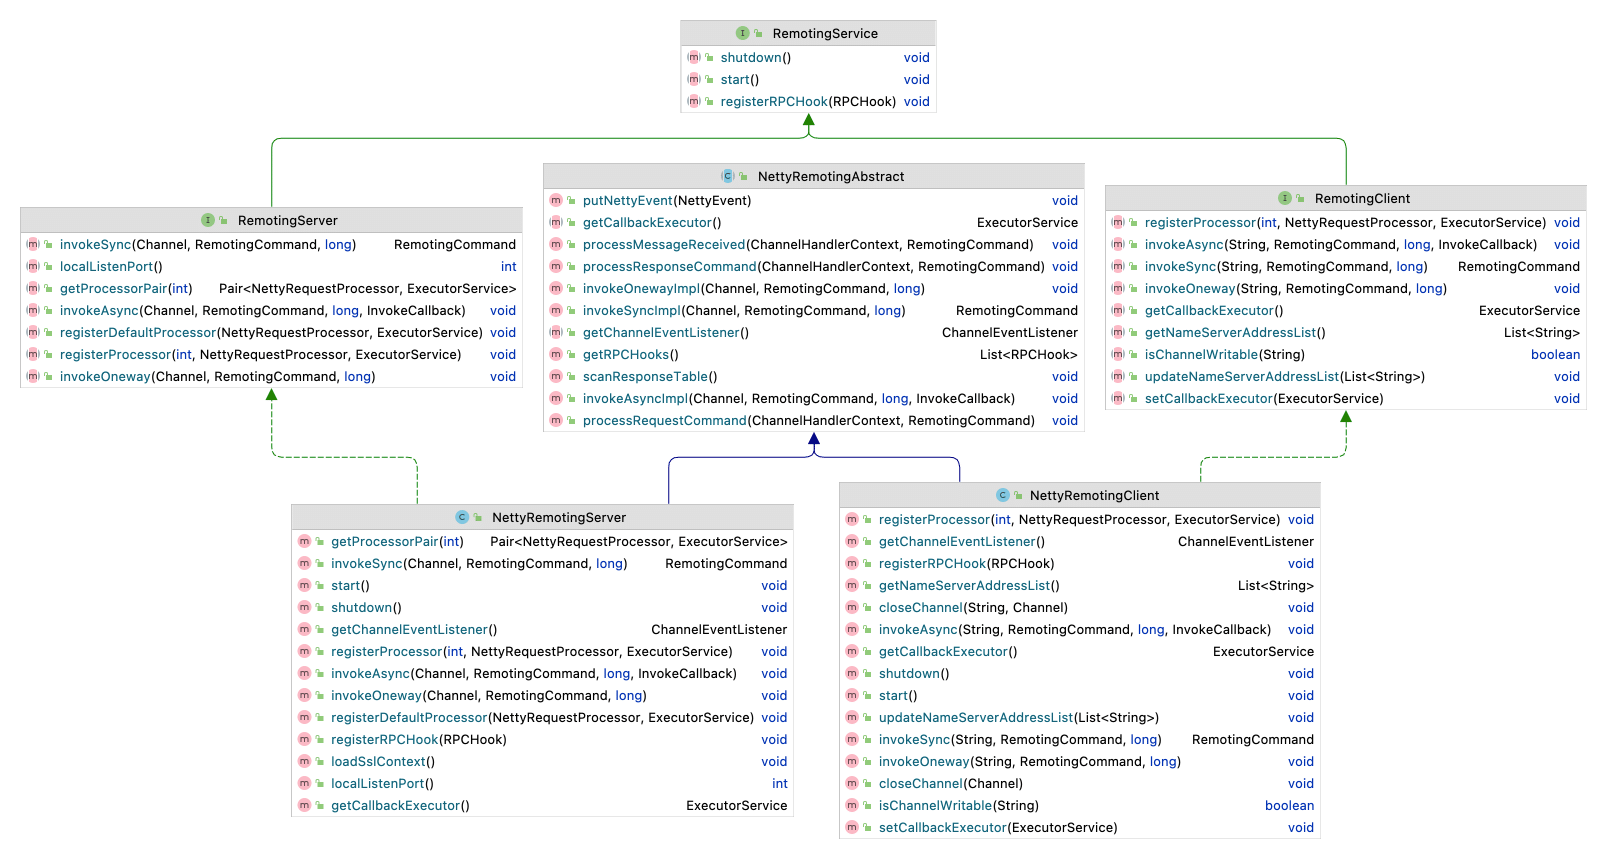
在 RocketMQ 的通信层中有三个重要的接口。
- RemotingService
- RemotingServer
- RemotingClient
和一个抽象类 NettyRemotingAbstract,这个抽象类是服务端和客户端的实现的公共父类。
RemotingService 接口
RemotingService 接口是 RocketMQ 网络通信的顶层接口。
public interface RemotingService {
    // 启动服务
    void start();

    // 关闭服务
    void shutdown();

    // 注册 rpc hook
    void registerRPCHook(RPCHook rpcHook);
}
就是启动服务、关闭服务和注册 RPC 钩子函数。
关于 RPCHook 钩子函数,其实就是在发送 RPC 的前后调用的方法,有点类似 Spring 的环绕通知。
public interface RPCHook {
    void doBeforeRequest(final String remoteAddr, final RemotingCommand request);

    void doAfterResponse(final String remoteAddr, final RemotingCommand request,
        final RemotingCommand response);
}
RemotingServer 接口
RemotingServer 接口是 RocketMQ 中作为服务端的接口。
public interface RemotingServer extends RemotingService {

    // 注册协议处理器
    void registerProcessor(final int requestCode, final NettyRequestProcessor processor,
        final ExecutorService executor);

    // 注册默认的协议处理器
    void registerDefaultProcessor(final NettyRequestProcessor processor, final ExecutorService executor);

    int localListenPort();

    // 根据消息 code 获取协议处理器
    Pair<NettyRequestProcessor, ExecutorService> getProcessorPair(final int requestCode);

    // 同步发送消息
    RemotingCommand invokeSync(final Channel channel, final RemotingCommand request,
        final long timeoutMillis) throws InterruptedException, RemotingSendRequestException,
        RemotingTimeoutException;

    // 异步发送消息
    void invokeAsync(final Channel channel, final RemotingCommand request, final long timeoutMillis,
        final InvokeCallback invokeCallback) throws InterruptedException,
        RemotingTooMuchRequestException, RemotingTimeoutException, RemotingSendRequestException;

    // 单向发送消息
    void invokeOneway(final Channel channel, final RemotingCommand request, final long timeoutMillis)
        throws InterruptedException, RemotingTooMuchRequestException, RemotingTimeoutException,
        RemotingSendRequestException;

}
API 分析:
- 因为是服务端,它要处理来自客户端的请求,所以需要提供一些注册业务处理器的方法,例如 registerProcessor 方法;
- 提供了发送 RPC 请求的 API,例如发送同步消息的 invokeSync 方法;
RemotingClient 接口
RemotingClient 接口和 RemotingServer 接口提供的 API 差不多,提供了发送 RPC 请求的 API,例如发送同步消息的 invokeSync 方法。
另外 RemotingClient 提供了获取 NameServer 地址的方法
public interface RemotingClient extends RemotingService {
    // 更新 NameServer 的地址
    void updateNameServerAddressList(final List<String> addrs);

    // 获取 NameServer 的地址
    List<String> getNameServerAddressList();

}
NettyRemotingAbstract 抽象类
NettyRemotingAbstract 抽象类是 NettyRemotingServer 和 NettyRemotingClient 公共父类。主要是定义了客户端和服务端都用到的一些属性。例如:
(1)请求的并发限制,用于防止系统内存占用过高:
// 单向请求的并发量,防止系统内存占用过高
protected final Semaphore semaphoreOneway;

// 异步请求的并发量,防止系统内存占用过高
protected final Semaphore semaphoreAsync;
(2)一个 RPC 都有一个请求 id,在发送 RPC 请求之前将请求 id 存放到 responseTable 中保存,当对端响应数据后又将请求 id 对应的 ResponseFuture 从 responseTable 中移除。通过定时扫描 responseTable 就可以知道那些 RPC 请求超时了。
protected final ConcurrentMap<Integer /* opaque */, ResponseFuture> responseTable =
    new ConcurrentHashMap<Integer, ResponseFuture>(256);
(3)请求 code 和对应的业务处理器、线程池的映射关系。也就是说一个 code 对应的请求需要对应的 NettyRequestProcessor 来处理;
protected final HashMap<Integer/* request code */, Pair<NettyRequestProcessor, ExecutorService>> processorTable =
    new HashMap<Integer, Pair<NettyRequestProcessor, ExecutorService>>(64);
(4)缺省的业务处理器,也就是说假如 code 对应的业务处理器在(3)的映射关系中没有找到,就用缺省的 defaultRequestProcessor 来处理了。NameServer 用的就是这个 。
protected Pair<NettyRequestProcessor, ExecutorService> defaultRequestProcessor;(5)NettyEventExecutor 是 Thread 类型,它的作用是监听 Netty 的 Channel 状态变化。当 Channel 的状态发生改变后,监听状态改变的监听器就会执行对应的方法。
protected final NettyEventExecutor nettyEventExecutor = new NettyEventExecutor();(6)RPCHook 列表,在执行 RPC 前后时会执行这些钩子函数的逻辑。类似 Spring 的环绕通知。
protected List<RPCHook> rpcHooks = new ArrayList<RPCHook>();关于 NettyRemotingAbstract 实现的方法,就是发送消息、执行钩子函数、检查 RPC 请求是否超时等方法,遇到了再具体分析。
消息协议设计以及编解码
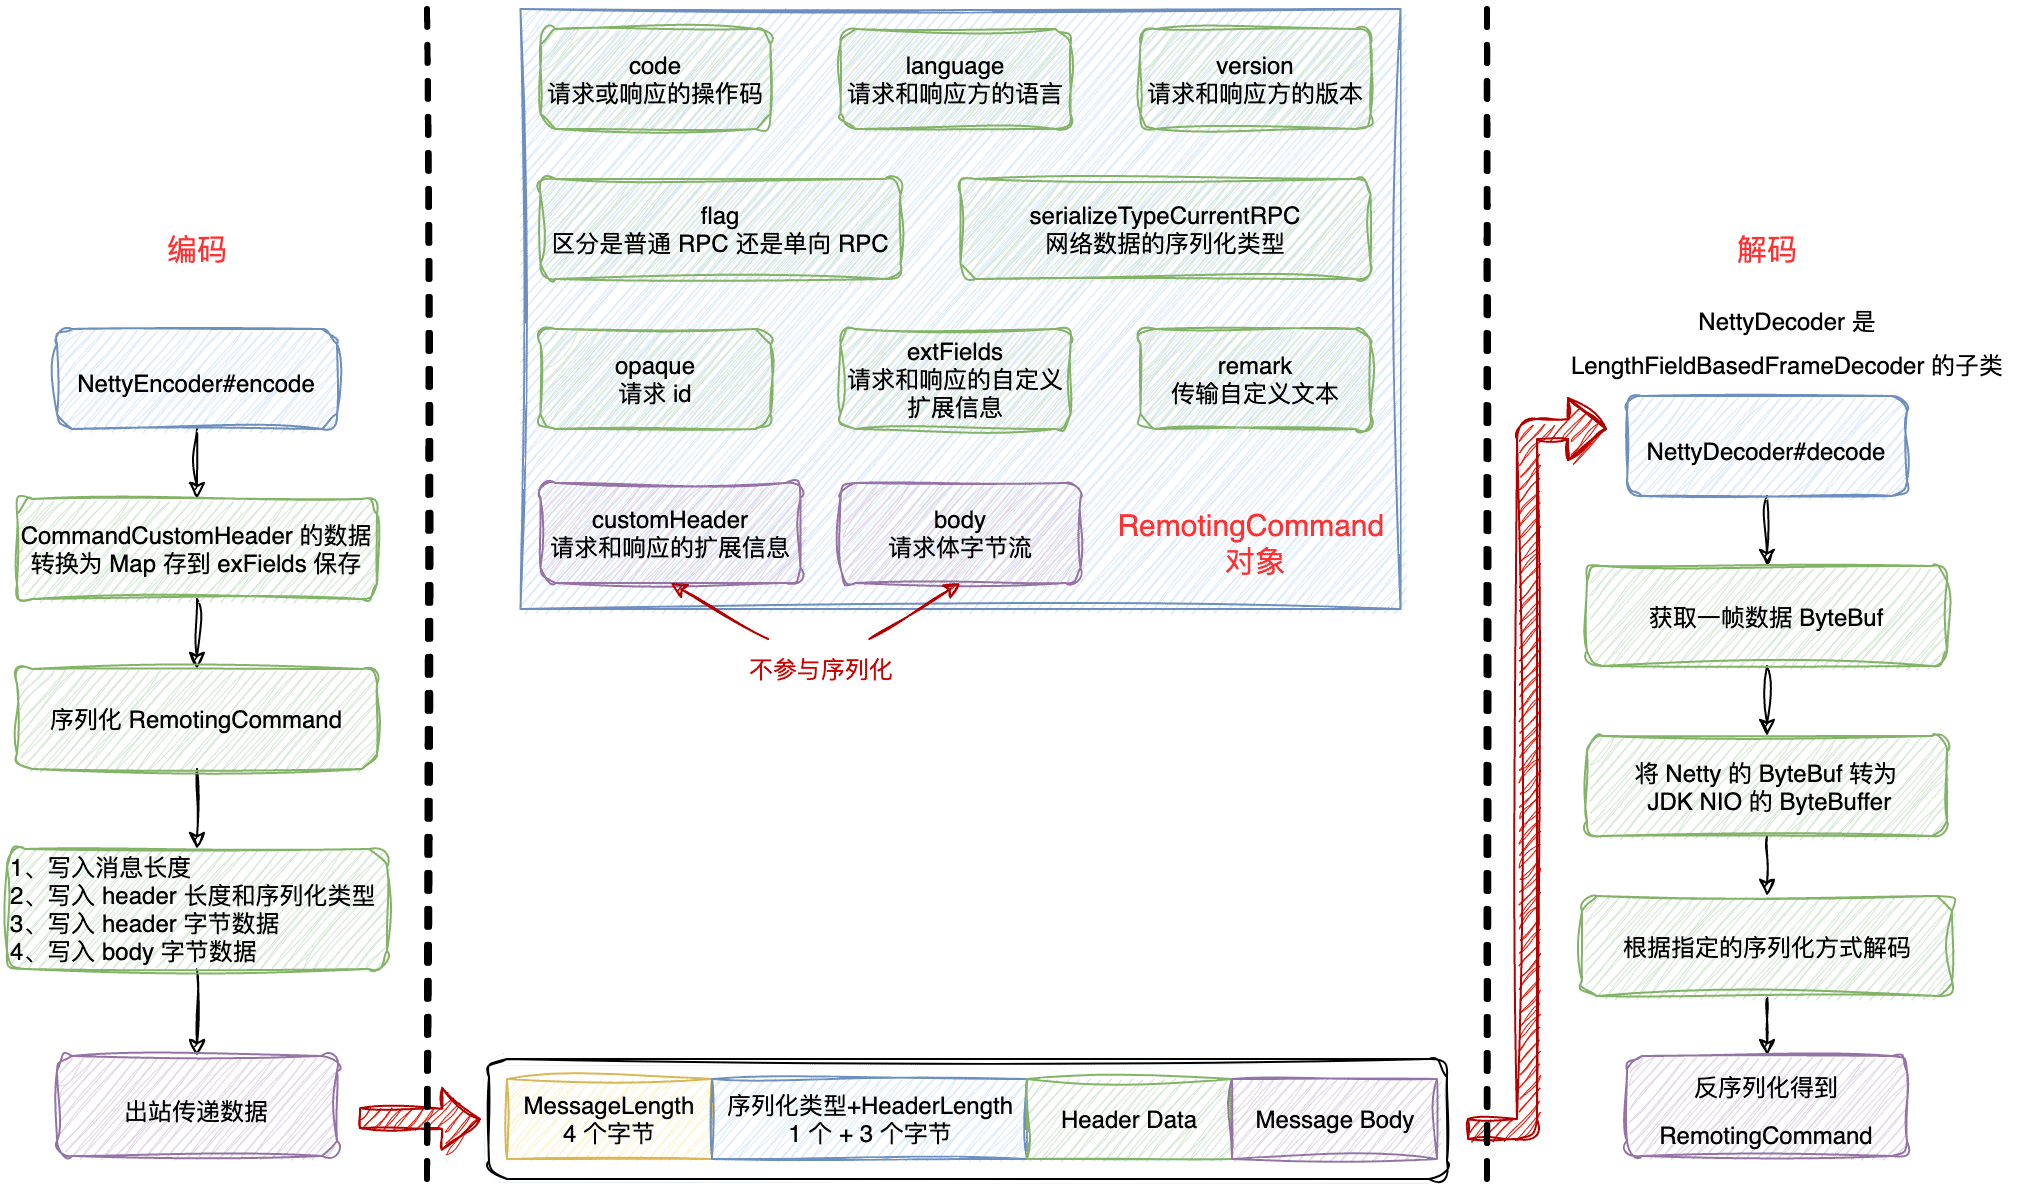
协议设计
RocketMQ 中的网络传输数据的格式如下:

可见传输内容主要可以分为以下 4 部分:
- 消息长度:总长度,四个字节存储,占用一个 int 类型;
- 序列化类型 & 消息头长度:同样占用一个 int 类型,第一个字节表示序列化类型,后面三个字节表示消息头长度;
- 消息头 Header 数据:经过序列化后的消息头数据;
- 消息体 Body 数据:消息主体的二进制字节数据内容;
关于消息头的各个字段的格式如下表所示:
| Header字段 | 类型 | Request 说明 | Response 说明 |
|---|---|---|---|
| code | int | 请求操作码,应答方根据不同的请求码进行不同的业务处理 | 应答响应码。0表示成功,非0则表示各种错误 |
| language | LanguageCode | 请求方实现的语言 | 应答方实现的语言 |
| version | int | 请求方程序的版本 | 应答方程序的版本 |
| opaque | int | 相当于 requestId,在同一个连接上的不同请求标识码,与响应消息中的相对应 | 应答不做修改直接返回 |
| flag | int | 区分是普通 RPC 还是 oneway RPC 的标志 | 区分是普通 RPC 还是 onewayRPC 的标志 |
| remark | String | 传输自定义文本信息 | 传输自定义文本信息 |
| extFields | HashMap<String, String> | 请求自定义扩展信息 | 响应自定义扩展信息 |
以 broker 向 NameServer 注册的 RPC 请求的消息头 Header 为例,它的数据长下面这样,其中 extFields 是每种请求特有自定义的数据,其他数据是所有请求和响应共用的字段。
{
    "code": 103,
    "extFields": {
        "brokerId": "0",
        "bodyCrc32": "1818433699",
        "clusterName": "DefaultCluster",
        "brokerAddr": "172.16.50.43:10911",
        "haServerAddr": "172.16.50.43:10912",
        "compressed": "false",
        "brokerName": "broker-a"
    },
    "flag": 0,
    "language": "JAVA",
    "opaque": 2,
    "serializeTypeCurrentRPC": "JSON",
    "version": 399
}
关于传输的消息体,每种类型的消息体都不一样,有的消息其实也没有消息体。同样以 broker 向 NameServer 注册的 RPC 请求的消息体 Body 为例:
{
    "filterServerList": [],
    "topicConfigSerializeWrapper": {
        "dataVersion": {
            "counter": 3,
            "timestamp": 1649954601593
        },
        "topicConfigTable": {
            "SCHEDULE_TOPIC_XXXX": {
                "order": false,
                "perm": 6,
                "readQueueNums": 18,
                "topicFilterType": "SINGLE_TAG",
                "topicName": "SCHEDULE_TOPIC_XXXX",
                "topicSysFlag": 0,
                "writeQueueNums": 18
            },

            // ...... 省略其它 ......
        }
    }
}
RemotingCommand 消息封装
在 RocketMQ 中所有要传输的网络数据封装在 RemotingCommand 类中,下面看下它的成员属性,可以很清楚的看到,RemotingCommand 类的属性和我们上一节的协议设计的字段一模一样。
// 消息请求或响应的 code
private int code;
// 请求方或响应方使用的语言
private LanguageCode language = LanguageCode.JAVA;
// 请求方或响应方程序的版本号
private int version = 0;
// requestId
private int opaque = requestId.getAndIncrement();
// 标记位,区分是普通 RPC 还是 oneway RPC 的标志,
// 1-响应
// 2-oneway
private int flag = 0;
// 传输自定义文本信息
private String remark;
// 自定义扩展信息
private HashMap<String, String> extFields;

// 不参与序列化 反射将 customHeader 压入到 extFields
private transient CommandCustomHeader customHeader;

// 序列化类型,默认 json
private SerializeType serializeTypeCurrentRPC = serializeTypeConfigInThisServer;

// 不参与序列化
private transient byte[] body;
有两个字段需要注意,那就是 customHeader 和 body,这两个字段被 transient 修饰,也就是说这两个字段不参与序列化。
- body:在组装数据的时候就被转换成字节流了;
- customHeader:这个字段会在 NettyEncoder 中处理,其实就是将 customHeader 字段的内容存放到 Map 类型的 extFields 中,再参与序列化;
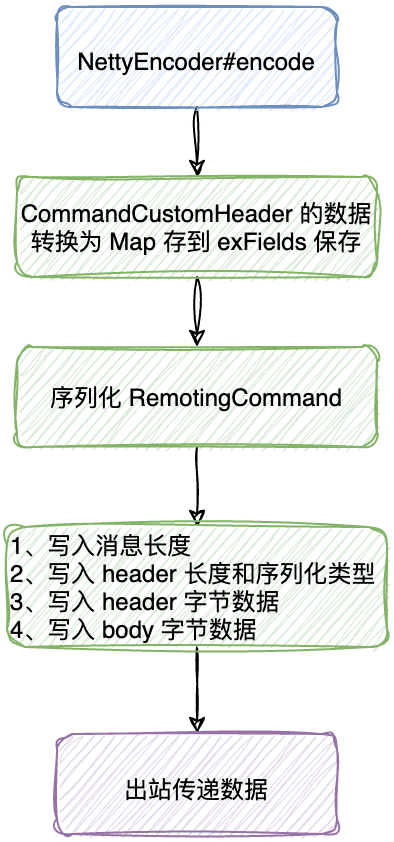
NettyEncoder 编码器
编码器的流程如下:
@ChannelHandler.Sharable
public class NettyEncoder extends MessageToByteEncoder<RemotingCommand> {
    private static final InternalLogger log = InternalLoggerFactory.getLogger(RemotingHelper.ROCKETMQ_REMOTING);

    /**
     * 编码
     *
     * RemotingCommand 对象里的 customHeader 和 body 不参与序列化
     * 会将 customHeader 里的字段通过反射添加到 extFields(一个 map)中
     */
    @Override
    public void encode(ChannelHandlerContext ctx, RemotingCommand remotingCommand, ByteBuf out)
        throws Exception {
        try {
            ByteBuffer header = remotingCommand.encodeHeader();
            out.writeBytes(header);
            byte[] body = remotingCommand.getBody();
            if (body != null) {
                out.writeBytes(body);
            }
        } catch (Exception e) {
            log.error("encode exception, " + RemotingHelper.parseChannelRemoteAddr(ctx.channel()), e);
            if (remotingCommand != null) {
                log.error(remotingCommand.toString());
            }
            RemotingUtil.closeChannel(ctx.channel());
        }
    }
}
那么关键就是 RemotingCommand#encodeHeader() 方法:
代码很简单:
- 调用重载的 encodeHeader 方法,
- 假如 RemotingCommand 的 body 属性有值就传入 body 的长度;
- 假如没有值就传 0;
- 调用 RemotingCommand#headerEncode 将 RemotingCommand 序列化;(注意 transient 修饰的字段不被序列化)
- 依次添加,消息总长度 length,序列化类型 + headerLength,header Data 到 ByteBuffer 里;
那么问题来了,我们的 body Data 怎么没添加到 ByteBuffer 里啊?这个是在 NettyEncoder 中添加的。
public ByteBuffer encodeHeader() {
    return encodeHeader(this.body != null ? this.body.length : 0);
}

public ByteBuffer encodeHeader(final int bodyLength) {
    // 1> header length size
    int length = 4;

    // 2> header data length
    byte[] headerData;
    headerData = this.headerEncode();

    length += headerData.length;

    // 3> body data length
    length += bodyLength;

    // 申请堆内内存 4 + (4 + headerData.length)
    ByteBuffer result = ByteBuffer.allocate(4 + length - bodyLength);

    // length 4个字节
    result.putInt(length);

    // header length  4个字节
    result.put(markProtocolType(headerData.length, serializeTypeCurrentRPC));

    // header data
    result.put(headerData);

    result.flip();

    return result;
}
OK 这里已经知道 RocketMQ 是如何编码的了。
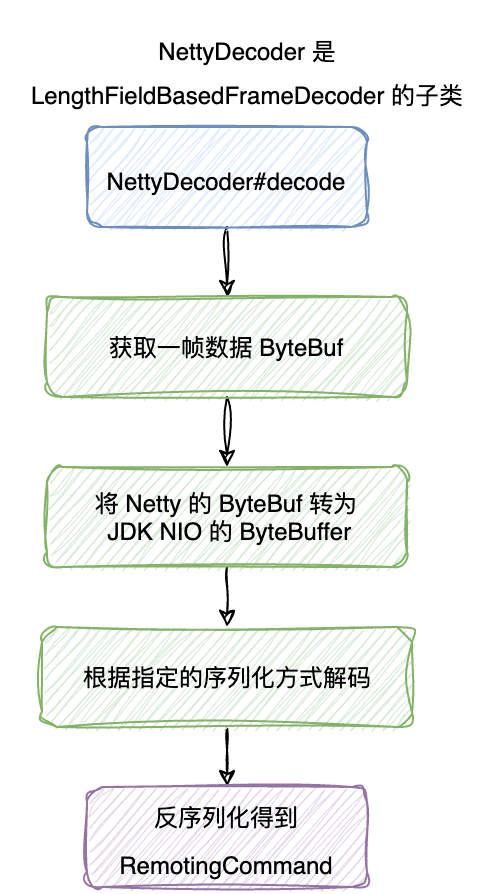
NettyDecoder 解码器
NettyDecoder 继承自 LengthFieldBasedFrameDecoder,为了解决粘包拆包问题。
构造方法:
public NettyDecoder() {
    // |长度 4 字节| - | 数据 |
    super(FRAME_MAX_LENGTH, 0, 4, 0, 4);
}
根据它的构造方法,可以得到的信息是:
lengthFieldOffset = 0
lengthFieldLength  = 4
lengthAdjustment   = 0
initialBytesToStrip = 4

BEFORE DECODE (16 bytes)         AFTER DECODE (12 bytes)
+------------+----------------+      +----------------+
|   Length   | Actual Content |----->| Actual Content |
| 0x0000000C | "HELLO, WORLD" |      | "HELLO, WORLD" |
+------------+----------------+      +----------------+
解码流程:
- 获取一帧数据;
- 将该 Netty 的 ByteBuf 转为 JDK NIO 的ByteBuffer;
- 调用 RemotingCommand#decode(ByteBuffer) 方法解码,将网络数据转换为 RemotingCommand 实例;
public class NettyDecoder extends LengthFieldBasedFrameDecoder {
    private static final InternalLogger log = InternalLoggerFactory.getLogger(RemotingHelper.ROCKETMQ_REMOTING);

    private static final int FRAME_MAX_LENGTH =
        Integer.parseInt(System.getProperty("com.rocketmq.remoting.frameMaxLength", "16777216"));

    public NettyDecoder() {
        // |长度 4 字节| - | 数据 |
        super(FRAME_MAX_LENGTH, 0, 4, 0, 4);
    }

    @Override
    public Object decode(ChannelHandlerContext ctx, ByteBuf in) throws Exception {
        ByteBuf frame = null;
        try {

            frame = (ByteBuf) super.decode(ctx, in);
            if (null == frame) {
                return null;
            }

            // 转换为 ByteBuffer
            ByteBuffer byteBuffer = frame.nioBuffer();

             // 此时的 ByteBuffer 是
            // | 4 字节(1 个存序列化协议类型,3 个存headerData.length)| - | headerData 数据| - | body 数据 |
            return RemotingCommand.decode(byteBuffer);
        } catch (Exception e) {
            log.error("decode exception, " + RemotingHelper.parseChannelRemoteAddr(ctx.channel()), e);
            RemotingUtil.closeChannel(ctx.channel());
        } finally {
            if (null != frame) {
                frame.release();
            }
        }

        return null;
    }
}
那么关键就是 RemotingCommand#decode(ByteBuffer) 方法,这个方法里面就是 JDK NIO 的 API 操作了。
public static RemotingCommand decode(final ByteBuffer byteBuffer) throws RemotingCommandException {
        // headerData.length + body.length
        int length = byteBuffer.limit();
        // 这个 oriHeaderLen 里包含了 协议类型 和 headerData.length
        int oriHeaderLen = byteBuffer.getInt();
        // 获取 headerData.length
        int headerLength = getHeaderLength(oriHeaderLen);

        byte[] headerData = new byte[headerLength];
        byteBuffer.get(headerData);

        // 获取协议类型,解码 headerData
        RemotingCommand cmd = headerDecode(headerData, getProtocolType(oriHeaderLen));

        // 计算 body 的长度
        int bodyLength = length - 4 - headerLength;
        byte[] bodyData = null;
        if (bodyLength > 0) {
            bodyData = new byte[bodyLength];
            // 获取 body 数据
            byteBuffer.get(bodyData);
        }
        cmd.body = bodyData;

        return cmd;
    }
十分明了啦,解码后得到 RemotingCommand 实例。
消息协议和编解码小结
发送消息
在 RocketMQ 中,发送 RPC 消息有三种类型:
- 发送同步消息;
- 发送异步消息;
- 发送单向消息;
发送同步消息
以 NettyRemotingClient#invokeSync 分析,Server 端也有类似的。首先看下发送同步消息的整体流程图:
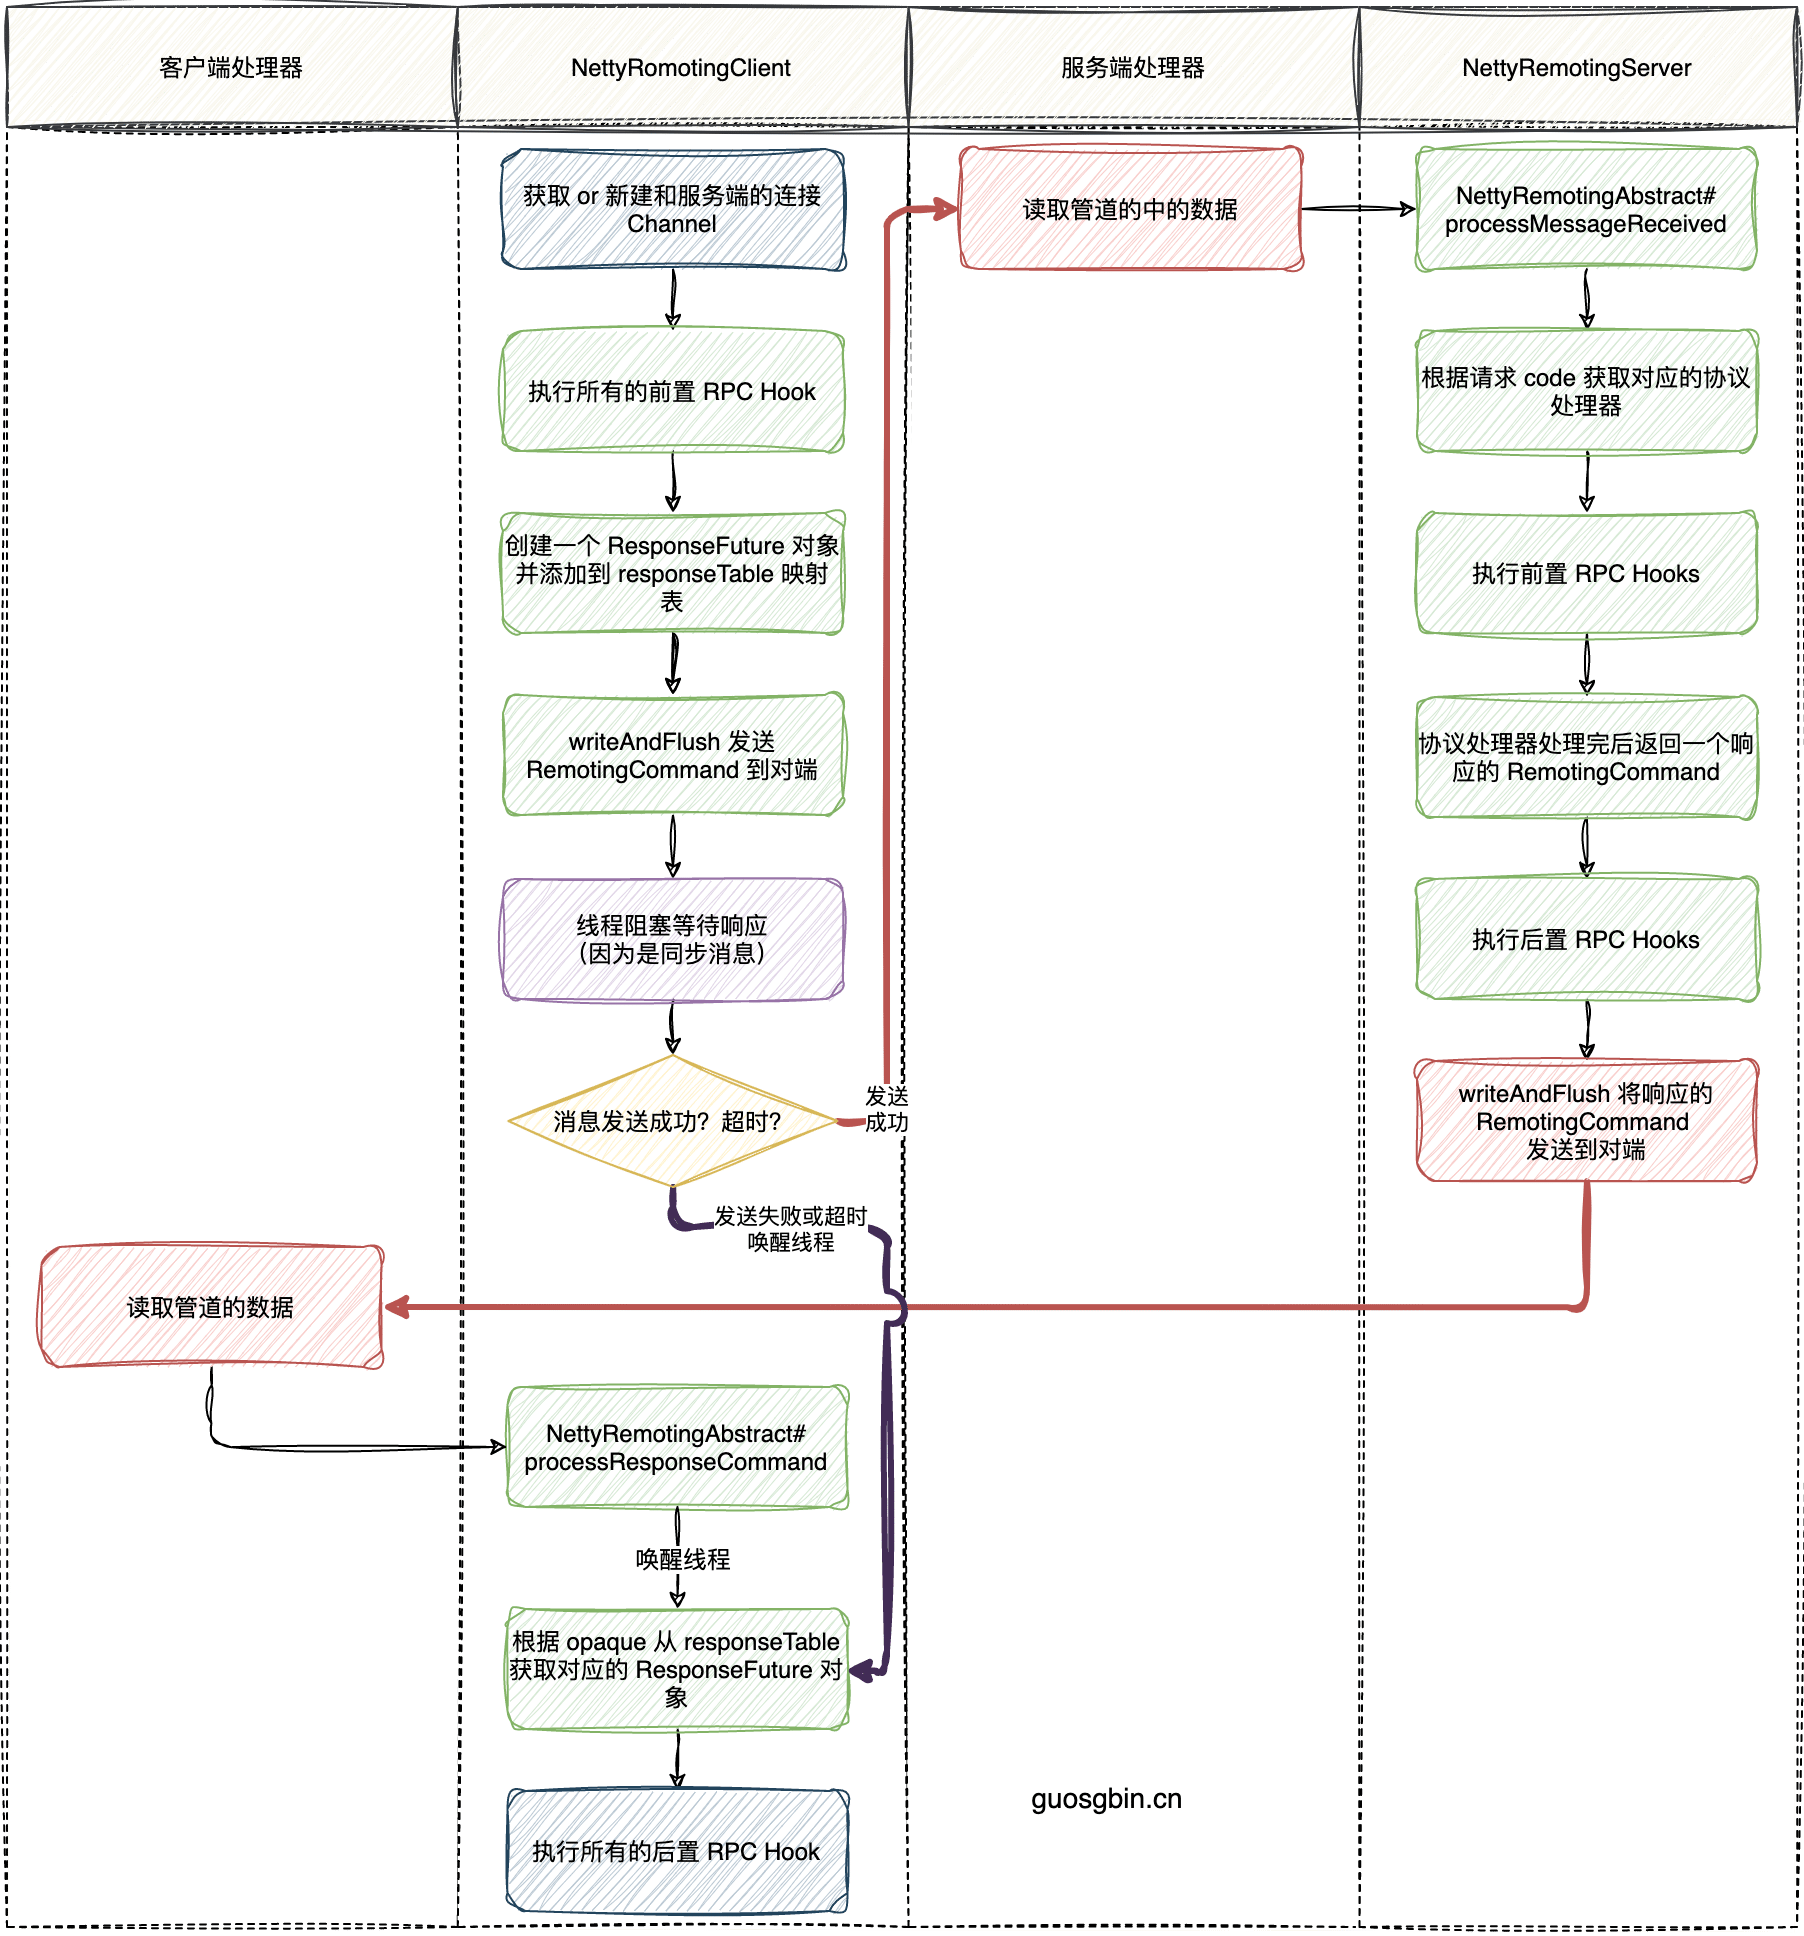
发送同步消息准备
主要流程:
- 因为是客户端,首先需要和服务端建立连接,所以需要调用 NettyRemotingClient#getAndCreateChannel 方法获取连接 Channel;
- 校验连接状态后,首先执行所有的前置的 RPC hook 函数;
- 校验执行前置 RPC 钩子函数的时候是否超时;
- 执行抽象类的 NettyRemotingAbstract#invokeSyncImpl 方法发送同步消息;
- 执行所有的后置的 RPC hook 函数;
@Override
public RemotingCommand invokeSync(String addr, final RemotingCommand request, long timeoutMillis)
    throws InterruptedException, RemotingConnectException, RemotingSendRequestException, RemotingTimeoutException {
    long beginStartTime = System.currentTimeMillis();
    // 获取或者创建一个客户端和服务端的通道 Channel,
    final Channel channel = this.getAndCreateChannel(addr);
    // 校验通道的状态,条件成立则说明客户端和服务端的通到已经连接,可以通信
    if (channel != null && channel.isActive()) {
        try {
            // 执行 RPC 钩子函数
            doBeforeRpcHooks(addr, request);
            long costTime = System.currentTimeMillis() - beginStartTime;
            if (timeoutMillis < costTime) {
                throw new RemotingTimeoutException("invokeSync call the addr[" + addr + "] timeout");
            }
            // 同步获得服务端的响应数据 response
            RemotingCommand response = this.invokeSyncImpl(channel, request, timeoutMillis - costTime);
            // 执行 RPC 钩子函数
            doAfterRpcHooks(RemotingHelper.parseChannelRemoteAddr(channel), request, response);
            return response;
        } catch (RemotingSendRequestException e) {
           // ...... 省略异常处理 ......
        } catch (RemotingTimeoutException e) {
            // ...... 省略异常处理 ......
        }
    } else {
        this.closeChannel(addr, channel);
        throw new RemotingConnectException(addr);
    }
}
发送同步消息过程
OK 下面来分析 NettyRemotingAbstract#invokeSyncImpl 做了什么
发送同步消息的入参就分为三个:
- 连接的 Channel;
- 网络数据的封装对象 RemotingCommand;
- RPC 超时时间;
NettyRemotingAbstract#invokeSyncImpl 方法比较长,我们分步分析该方法的逻辑:
(1)首先获取此次的请求 id,代表当前请求。
final int opaque = request.getOpaque();(2)创建 ResponseFuture 对象,该对象保存了当前请求相关的数据,如 Channel、请求 id、RPC 超时时间。将 ResponseFuture 保存到 NettyRemotingAbstract#responseTable 中,这是一个 Map。
// 创建 ResponseFuture 对象
final ResponseFuture responseFuture = new ResponseFuture(channel, opaque, timeoutMillis, null, null);
// 添加到请求的映射表内 key 是 opaque
this.responseTable.put(opaque, responseFuture);
(3)发送数据到对端,并添加监听器。(监听器的代码这里先省略不看)
// request 写入到客户端 Channel,并注册监听器
channel.writeAndFlush(request).addListener(new ChannelFutureListener() {
    @Override
    public void operationComplete(ChannelFuture f) throws Exception {
        // ...... 省略监听器的代码 ......
    }
});
(4)因为是同步发送消息,需要等待服务端的数据返回。所以这里用 CountDownLatch 来做线程通信。
// 因为同步调用,业务线程在这里挂起,指定超时时间
RemotingCommand responseCommand = responseFuture.waitResponse(timeoutMillis);
ResponseFuture#waitResponse 方法的实现如下,其中 CountDownLatch 的初始值是 1。当 CountDownLatch 的值减少到了 0 时,就会返回 responseCommand 的数据了。
public RemotingCommand waitResponse(final long timeoutMillis) throws InterruptedException {
    this.countDownLatch.await(timeoutMillis, TimeUnit.MILLISECONDS);
    return this.responseCommand;
}
(5)数据是否发送成功,可以通过前面在 ctx.writeAndFlush(xxx) 的监听器中知道,监听器的代码如下:
// request 写入到客户端 Channel,并注册监听器
channel.writeAndFlush(request).addListener(new ChannelFutureListener() {
    @Override
    public void operationComplete(ChannelFuture f) throws Exception {
        if (f.isSuccess()) {
            // 请求写成功了
            responseFuture.setSendRequestOK(true);
            return;
        } else {
            // 写失败了...
            responseFuture.setSendRequestOK(false);
        }

        // 走到此处,前置条件是写失败了...
        // 当前请求的 responseFuture 从映射表移除
        responseTable.remove(opaque);
        // 设置失败原因
        responseFuture.setCause(f.cause());
        // 唤醒 countDownLatch#await 的线程
        responseFuture.putResponse(null);
        log.warn("send a request command to channel <" + addr + "> failed.");
    }
});- 成功发送数据到对端:设置 sendRequestOK 的值为 true 后,直接返回;
- 数据未成功发送:设置 sendRequestOK 的值为 false 后,将该请求 id 对应的 ResponseFuture 从 Map 中删除,同时调用 ResponseFuture#putResponse 将 CountDownLatch 的值减为 0,唤醒前面发送消息的线程。
public void putResponse(final RemotingCommand responseCommand) {
    this.responseCommand = responseCommand;
    this.countDownLatch.countDown();
}
(6)这里分析数据成功发送到服务端后,服务端响应数据到客户端,最终会调用到 NettyRemotingAbstract#processResponseCommand 方法,可以看到也是将该请求 id 对应的 ResponseFuture 从 Map 中删除,同时调用 ResponseFuture#putResponse 将 CountDownLatch 的值减为 0,唤醒前面发送消息的线程
public void processResponseCommand(ChannelHandlerContext ctx, RemotingCommand cmd) {
    // 获取响应的 opaque
    final int opaque = cmd.getOpaque();
    // 从响应的映射表 responseTable 中获取 ResponseFuture
    final ResponseFuture responseFuture = responseTable.get(opaque);
    if (responseFuture != null) {
        // 设置客户端 cmd
        responseFuture.setResponseCommand(cmd);

        // 通过 opaque 移除 ResponseFuture
        responseTable.remove(opaque);

        if (responseFuture.getInvokeCallback() != null) {
            // ...... 省略异步处理 ......
        } else {
            // 同步走这里
            // 设置 future 的结果,这里会调用 CountDownLatch 的 countDown() 方法
            // 将同步调用的业务线程唤醒
            responseFuture.putResponse(cmd);
            responseFuture.release();
        }
    } else {
        // ...... 省略日志打印 ......
    }
}
(7)最后是返回响应数据 responseCommand。有三种情况:
- 正常情况:对端返回数据了,将发送同步消息的线程唤醒;
- 异常情况:countDownLatch#await 超时自动唤醒;
- 异常情况:发送数据到服务端失败,例如写缓冲区满了;
if (null == responseCommand) {
    if (responseFuture.isSendRequestOK()) {
        // CASE2:超时
        throw new RemotingTimeoutException(RemotingHelper.parseSocketAddressAddr(addr), timeoutMillis,
            responseFuture.getCause());
    } else {
        // CASE3:发送失败
        throw new RemotingSendRequestException(RemotingHelper.parseSocketAddressAddr(addr), responseFuture.getCause());
    }
}
// CASE1:正常情况,返回客户端请求结果
return responseCommand;
发送异步消息
既然是发送异步消息,那么就必须要一个回调函数,当对端处理完消息时需要回调这个函数。
RocketMQ 中的 org.apache.rocketmq.remoting.InvokeCallback 接口就是定义回调函数的接口,就一个方法。
public interface InvokeCallback {
    void operationComplete(final ResponseFuture responseFuture);
}
NettyRemotingClient#invokeAsync 发送异步方法的流程和上面发送同步消息的流程基本上一样。先看流程图:
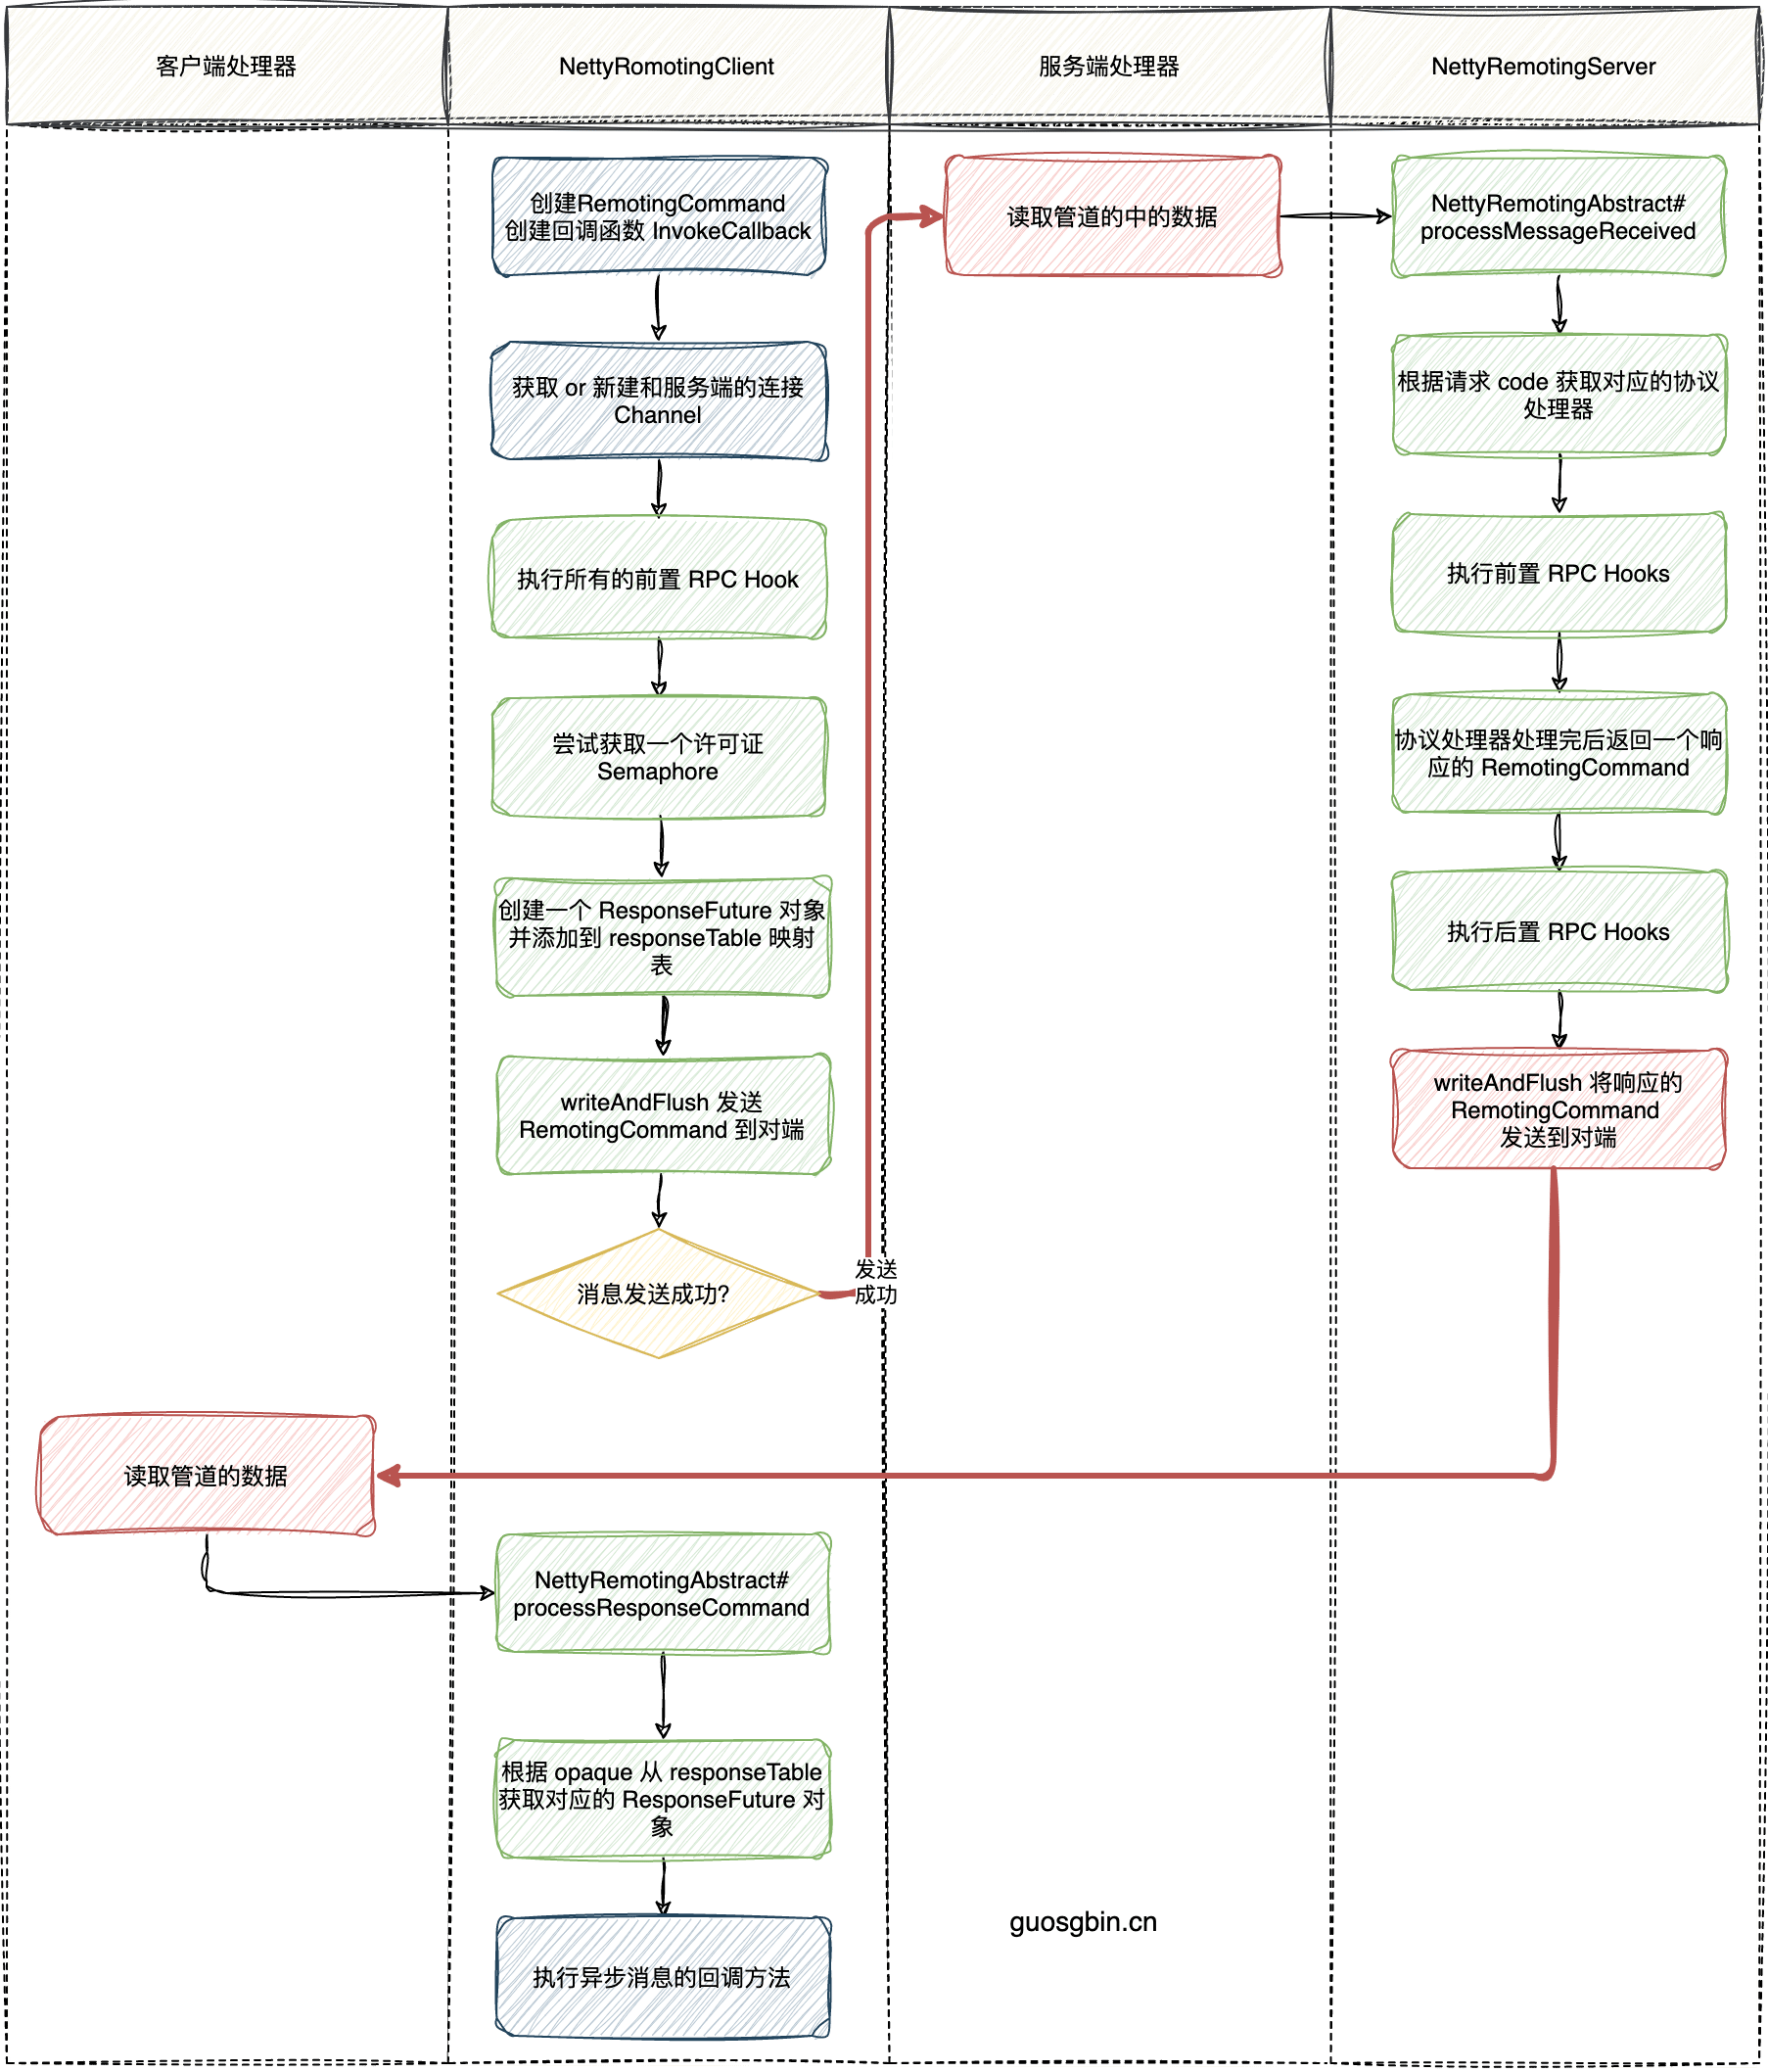
直接来看 NettyRemotingAbstract#invokeAsyncImpl 吧。
入参:
- 连接通道 Channel;
- 网络请求对象 RemotingCommand;
- RPC 超时时间;
- 回调函数;
前面已经分析过发送同步 RPC 消息的过程,在分析发送异步消息的流程就简单点,主要分析差异点。
public void invokeAsyncImpl(final Channel channel, final RemotingCommand request, final long timeoutMillis,
        final InvokeCallback invokeCallback)
        throws InterruptedException, RemotingTooMuchRequestException, RemotingTimeoutException, RemotingSendRequestException {
        // 开始时间
        long beginStartTime = System.currentTimeMillis();
        // 请求 id
        final int opaque = request.getOpaque();
        // 因为有发送异步消息有并发度的限制,尝试获取一个信号量许可证,会阻塞线程
        boolean acquired = this.semaphoreAsync.tryAcquire(timeoutMillis, TimeUnit.MILLISECONDS);
        if (acquired) {
            // SemaphoreReleaseOnlyOnce 对象封装了释放信号量的操作
            final SemaphoreReleaseOnlyOnce once = new SemaphoreReleaseOnlyOnce(this.semaphoreAsync);
            long costTime = System.currentTimeMillis() - beginStartTime;
            if (timeoutMillis < costTime) {
                // 已经超时了,需要释放信号量
                once.release();
                throw new RemotingTimeoutException("invokeAsyncImpl call timeout");
            }

            // 注意剩余的超时时间是 timeoutMillis - costTime
            // 创建 ResponseFuture 对象
            final ResponseFuture responseFuture = new ResponseFuture(channel, opaque, timeoutMillis - costTime, invokeCallback, once);
            // 添加到映射表
            this.responseTable.put(opaque, responseFuture);
            try {
                // 业务线程将数据交给 Netty,netty 的 IO 线程做写和刷新的操作
                // 使用客户端 Channel 发送 request,注册监听器,监听器是 IO 线程调用的
                channel.writeAndFlush(request).addListener(new ChannelFutureListener() {
                    @Override
                    public void operationComplete(ChannelFuture f) throws Exception {
                        if (f.isSuccess()) {
                            responseFuture.setSendRequestOK(true);
                            return;
                        }
                        // 设置发送失败,删除映射表 responseTable 的数据,执行回调函数
                        requestFail(opaque);
                        log.warn("send a request command to channel <{}> failed.", RemotingHelper.parseChannelRemoteAddr(channel));
                    }
                });
            } catch (Exception e) {
               // ...... 省略异常处理 ......
            }
        } else {
           // ...... 省略获取许可证失败的处理,并发度过高 ......
        }
    }
这里主要分析异步 RPC 消息和同步 RPC 消息的差异点。
在 RocketMQ 中异步消息和 one way 消息都是用并发限制的,使用 Semaphore 来做并发限制;
同样是创建 ResponseFuture 对象,异步 RPC 消息多了 InvokeCallback 和 SemaphoreReleaseOnlyOnce 类型的参数。
- InvokeCallback:是异步消息发送成功或者发送失败后需要回调的函数,由业务自定义;
- SemaphoreReleaseOnlyOnce:我们说了异步消息是有并发度限制的,当异步消息发送成功或失败后需要释放此次获取的许可证;
最后在 channel.writeAndFlush(xxx) 的监听器中发送数据失败时调用了 NettyRemotingAbstract#requestFail 方法,它的实现如下,做的事情注释写的比较清楚。
private void requestFail(final int opaque) {
    // 移除映射表
    ResponseFuture responseFuture = responseTable.remove(opaque);
    if (responseFuture != null) {
        responseFuture.setSendRequestOK(false);
        // 里面会调用 countDownLatch.countDown()
        responseFuture.putResponse(null);
        try {
            // 执行回调方法
            executeInvokeCallback(responseFuture);
        } catch (Throwable e) {
            log.warn("execute callback in requestFail, and callback throw", e);
        } finally {
            // 释放 Semaphore 许可证
            responseFuture.release();
        }
    }
}
那么问题来了,前面只分析了异步消息发送失败后会做什么,那么异步消息发送成功后,对端响应消息后是如何执行回调函数的呢?
和同步 RPC 消息一样,同样是在 NettyRemotingAbstract#processResponseCommand 方法中处理的,就是调用自定义的 InvokeCallback 回调函数了。
public void processResponseCommand(ChannelHandlerContext ctx, RemotingCommand cmd) {
    // 获取响应的 opaque
    final int opaque = cmd.getOpaque();
    // 从响应的映射表 responseTable 中获取 ResponseFuture
    final ResponseFuture responseFuture = responseTable.get(opaque);
    if (responseFuture != null) {
        // 设置客户端 cmd
        responseFuture.setResponseCommand(cmd);

        // 通过 opaque 移除 ResponseFuture
        responseTable.remove(opaque);

        if (responseFuture.getInvokeCallback() != null) {
            // 异步走这里
            // 回调对象处理结果
            executeInvokeCallback(responseFuture);
        } else {
            // ...... 省略同步的处理 ......
        }
    } else {
        // ...... 省略 ......
    }
}
发送单向消息
先看流程图:
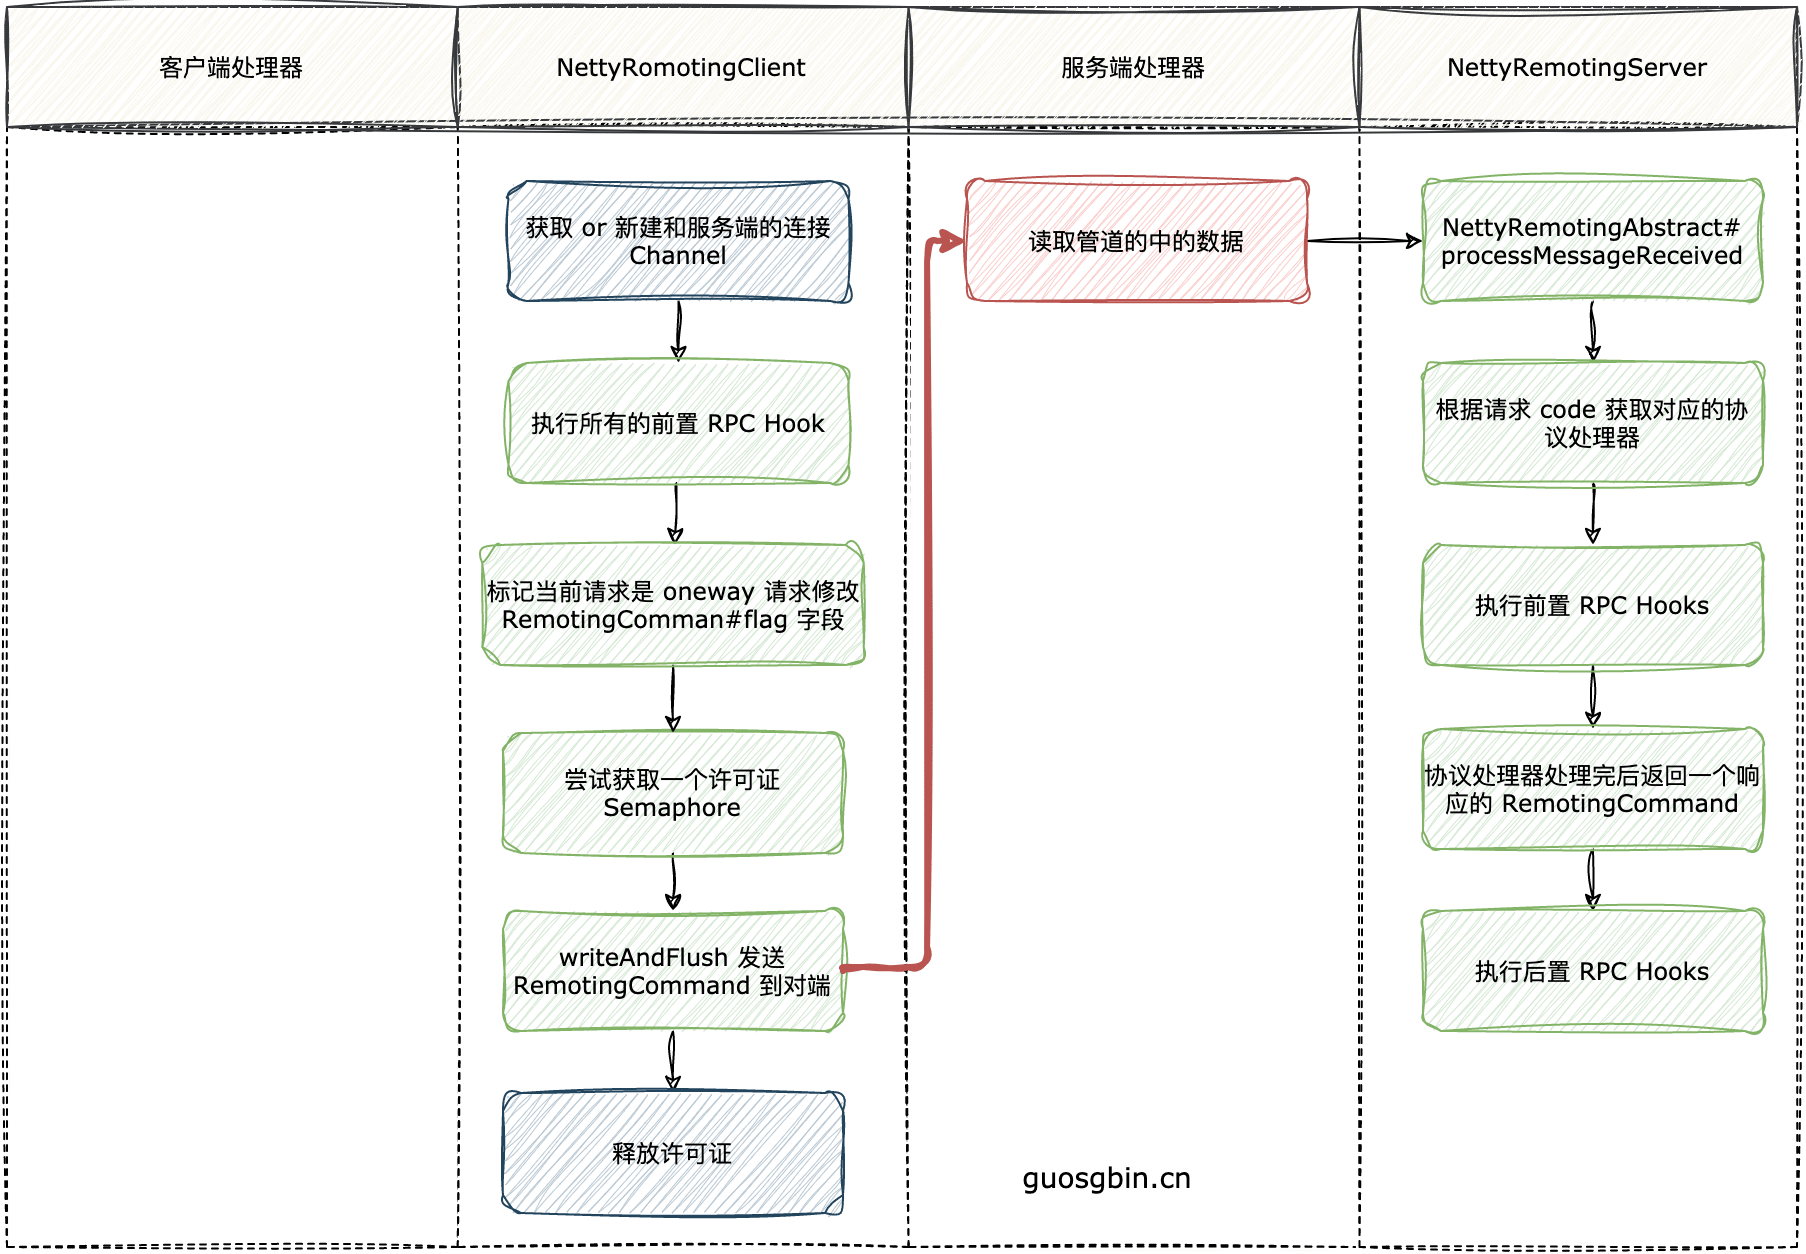
NettyRemotingClient#invokeOneway
@Override
public void invokeOneway(String addr, RemotingCommand request, long timeoutMillis) throws InterruptedException,
RemotingConnectException, RemotingTooMuchRequestException, RemotingTimeoutException, RemotingSendRequestException {
    final Channel channel = this.getAndCreateChannel(addr);
    if (channel != null && channel.isActive()) {
        try {
            doBeforeRpcHooks(addr, request);
            this.invokeOnewayImpl(channel, request, timeoutMillis);
        } catch (RemotingSendRequestException e) {
            // ...... 省略异常处理 ......
        }
    } else {
        // ...... 省略异常处理 ......
    }
}
两步骤:
- 获取已有连接,或者创建一个新的连接;
- 执行所有前置 RPC Hook 方法;
NettyRemotingClient#invokeOneway 发送单向消息:
public void invokeOnewayImpl(final Channel channel, final RemotingCommand request, final long timeoutMillis)
        throws InterruptedException, RemotingTooMuchRequestException, RemotingTimeoutException, RemotingSendRequestException {
        // 设置单向发送的标记,对端检查标记就可以知道是请求是单向请求
        request.markOnewayRPC();
        // 申请信号量
        boolean acquired = this.semaphoreOneway.tryAcquire(timeoutMillis, TimeUnit.MILLISECONDS);
        if (acquired) {
            // 释放信号量逻辑的封装对象
            final SemaphoreReleaseOnlyOnce once = new SemaphoreReleaseOnlyOnce(this.semaphoreOneway);
            try {
                // 将数据交给 Channel,这里数据发送的逻辑由 Netty 线程完成
                // 注册监听器,由 Netty 的 IO 线程回调
                channel.writeAndFlush(request).addListener(new ChannelFutureListener() {
                    @Override
                    public void operationComplete(ChannelFuture f) throws Exception {
                        // 只要操作完成,就释放信号量
                        once.release();
                        if (!f.isSuccess()) {
                            log.warn("send a request command to channel <" + channel.remoteAddress() + "> failed.");
                        }
                    }
                });
            } catch (Exception e) {
                once.release();
                // ...... 省略异常处理 ......
            }
        } else {
            // ...... 省略 发送单向消息并发太高,获取许可证超时 ......
        }
    }
发送单向消息相对于同步消息和异步消息简单很多,因为它不需要处理对端的响应。
- 单向消息的请求头特殊点,request.markOnewayRPC() 将 flag 改为 2,表示是单向消息,这样服务端就不用响应了;
- 单向消息同样是需要控制并发度的,也是通过 Semaphore 来控制的;
- 然后直接 channel.writeAndFlush(xxx) 发送数据到对端,应为是单向消息,所以不需要处理响应;
接收处理消息
接收消息入口
服务端和客户端都有一个处理器专门用来接收对端发送过来的消息。
- NettyRemotingClient.NettyClientHandler
- NettyRemotingServer.NettyServerHandler
以 NettyRemotingServer.NettyServerHandler 为例:
@ChannelHandler.Sharable
class NettyServerHandler extends SimpleChannelInboundHandler<RemotingCommand> {

    @Override
    protected void channelRead0(ChannelHandlerContext ctx, RemotingCommand msg) throws Exception {
        processMessageReceived(ctx, msg);
    }
}
它们最终都调用到了 NettyRemotingAbstract#processMessageReceived 方法,根据消息类型的不同做不同的处理。
public void processMessageReceived(ChannelHandlerContext ctx, RemotingCommand msg) throws Exception {
    final RemotingCommand cmd = msg;
    if (cmd != null) {
        switch (cmd.getType()) {
                // 处理请求
            case REQUEST_COMMAND:
                processRequestCommand(ctx, cmd);
                break;
                // 处理响应走这里
            case RESPONSE_COMMAND:
                processResponseCommand(ctx, cmd);
                break;
            default:
                break;
        }
    }
}
处理请求类型消息
TODO-KWOK 上图
NettyRemotingAbstract#processRequestCommand
public void processRequestCommand(final ChannelHandlerContext ctx, final RemotingCommand cmd) {
        // 根据业务 code,得到对应的处理器和线程池
        final Pair<NettyRequestProcessor, ExecutorService> matched = this.processorTable.get(cmd.getCode());
        // 假如没有找到对应的处理器和线程池,则使用缺省的处理器和线程池
        final Pair<NettyRequestProcessor, ExecutorService> pair = null == matched ? this.defaultRequestProcessor : matched;
        // 获取请求 id
        final int opaque = cmd.getOpaque();

        if (pair != null) {
            // 封装一个 Runnable 对象,核心逻辑入口
            Runnable run = new Runnable() {
                @Override
                public void run() {
                    // ...... 省略 Runnable 的具体实现 ......
                }
            };

            // ...... 省略是否忽略该请求的校验 ......

            try {
                // 将上面封装的 Runnable 和 Channel 和 cmd 封装为 RequestTask 对象
                final RequestTask requestTask = new RequestTask(run, ctx.channel(), cmd);
                // 获取处理器对应的线程池,提交任务
                pair.getObject2().submit(requestTask);
            } catch (RejectedExecutionException e) {
                // ...... 省略异常处理 ......
            }
        } else {
            // ...... 省略没有找到 code 对应的处理器的情况的处理 ......
        }
    }
流程如下:
- 根据 RemotingCommand 的 code 获取对应的协议处理器;
- 封装一个 Runnable 对象,这个 Runable 是干什么的下面分析;
- 封装一个 RequestTask 对象,将 Runnable 对象提交到对应的线程池中执行;
前面知道了就是封装一个 Runnable 对象并且执行,现在类分析 Runnable 对象做了什么:
Runnable run = new Runnable() {
    @Override
    public void run() {
        try {
            String remoteAddr = RemotingHelper.parseChannelRemoteAddr(ctx.channel());
            // RPC 前置钩子函数
            doBeforeRpcHooks(remoteAddr, cmd);
            // callback 封装响应客户端的逻辑
            final RemotingResponseCallback callback = new RemotingResponseCallback() {
                @Override
                public void callback(RemotingCommand response) {
                    // RPC 后置钩子函数
                    doAfterRpcHooks(remoteAddr, cmd, response);
                    if (!cmd.isOnewayRPC()) {
                        if (response != null) {
                            response.setOpaque(opaque);
                            response.markResponseType();
                            try {
                                // 将 response 写到对端
                                ctx.writeAndFlush(response);
                            } catch (Throwable e) {
                               // ...... 省略异常处理 ......
                            }
                        } else {
                        }
                    }
                }
            };
            // namesrv 使用的 DefaultRequestProcessor,是 AsyncNettyRequestProcessor 子类
            if (pair.getObject1() instanceof AsyncNettyRequestProcessor) {
                AsyncNettyRequestProcessor processor = (AsyncNettyRequestProcessor)pair.getObject1();
                // 处理请求
                processor.asyncProcessRequest(ctx, cmd, callback);
            } else {
                NettyRequestProcessor processor = pair.getObject1();
                RemotingCommand response = processor.processRequest(ctx, cmd);
                callback.callback(response);
            }
        } catch (Throwable e) {
            // ...... 省略异常处理 ......
            }
        }
    }
};
流程:
- 首先执行后置 RPC hook;
- 创建一个 RemotingResponseCallback 对象,
- 这个对象是在协议处理器处理完消息后会回调的方法;
- 首先是执行后置 RPC hook;
- 根据当前 RPC 是单向请求,还是异步 or 同步走不同的分支
- 假如是单向的 RPC 请求则不处理;
- 假如是同步或者异步,需要将响应的 RemotingCommand 对象写到对端;
- 根据协议处理器是否是 AsyncNettyRequestProcessor 类型走不同的分支,但是都是调用协议处理器的处理方法,并且在最后都调用 RemotingResponseCallback#callback 回调方法。
处理响应类型消息
NettyRemotingAbstract#processResponseCommand
服务端或客户端发送消息到对端后,假如是异步或同步消息时,对端处理完后需要响应消息。
前面我们已经知道了发送异步或同步消息时,会将当前请求 id 和 对应的 ResponseFuture 对象添加到 NettyRemotingAbstract#responseTable 中,那么当对端响应一条消息时,需要从 responseTable 中得到请求 id 对应的 ResponseFuture 进行处理。
public void processResponseCommand(ChannelHandlerContext ctx, RemotingCommand cmd) {
    // 获取响应的 opaque
    final int opaque = cmd.getOpaque();
    // 从响应的映射表 responseTable 中获取 ResponseFuture
    final ResponseFuture responseFuture = responseTable.get(opaque);
    if (responseFuture != null) {
        // 设置客户端 cmd
        responseFuture.setResponseCommand(cmd);

        // 通过 opaque 移除 ResponseFuture
        responseTable.remove(opaque);

        if (responseFuture.getInvokeCallback() != null) {
            // 异步走这里
            // 回调对象处理结果
            executeInvokeCallback(responseFuture);
        } else {
            // 同步走这里
            // 设置 future 的结果,这里会调用 CountDownLatch 的 countDown() 方法
            // 将同步调用的业务线程唤醒
            responseFuture.putResponse(cmd);
            responseFuture.release();
        }
    } else {
        log.warn("receive response, but not matched any request, " + RemotingHelper.parseChannelRemoteAddr(ctx.channel()));
        log.warn(cmd.toString());
    }
}
这里很明显:
- 根据请求 id 得到发送消息时创建的 ResponseFuture 对象。(这里有一种可能得到的是 null,可能是请求超时被移除了);
- 假如 responseFuture 中的 invokeCallback 属性不为 null,说明当前响应消息响应的是异步消息;
- 响应的是异步消息,执行 invokeCallback 回调方法;
- 响应的是同步消息,countDownLatch 唤醒当前的同步发送代码中 wait 等待的代码;
请求超时处理
在 NettyRemotingServer#start 和 NettyRemotingClient#start 中有个定时任务,每 1 秒扫描一次 NettyRemotingAbstract#responseTable 表,将超时的 responseFuture 从 responseTable 中移除,并执行它的回调方法(假如存在的话),
具体方法如下:
public void scanResponseTable() {
    // 超时的 responseFuture 的集合
    final List<ResponseFuture> rfList = new LinkedList<ResponseFuture>();
    Iterator<Entry<Integer, ResponseFuture>> it = this.responseTable.entrySet().iterator();
    while (it.hasNext()) {
        Entry<Integer, ResponseFuture> next = it.next();
        ResponseFuture rep = next.getValue();

        // 校验时间是否超时
        if ((rep.getBeginTimestamp() + rep.getTimeoutMillis() + 1000) <= System.currentTimeMillis()) {
            // 释放信号量
            rep.release();
            // 从 responseTable 中移除
            it.remove();
            // 添加到超时的 responseFuture 的集合
            rfList.add(rep);
            log.warn("remove timeout request, " + rep);
        }
    }

    // 一次回调超时的 ResponseFuture 的回调方法
    for (ResponseFuture rf : rfList) {
        try {
            executeInvokeCallback(rf);
        } catch (Throwable e) {
            log.warn("scanResponseTable, operationComplete Exception", e);
        }
    }
}