
16-ConsumeQueue原理分析
| 版本 | 内容 | 时间 |
|---|---|---|
| V1 | 新建 | 2023年06月22日13:01:04 |
概念
ConsumeQueue 是什么
ConsumeQueue:消息消费队列,引入的目的主要是提高消息消费的性能。
由于 RocketMQ 是基于主题 topic 的订阅模式,消息消费是针对主题进行的,如果要遍历 commitlog 文件,根据 topic 检索消息是非常低效的。Consumer 可根据 ConsumeQueue 来查找待消费的消息。其中,ConsumeQueue(逻辑消费队列)作为消费消息的索引,保存了指定 topic 下的队列消息在 CommitLog 中的起始物理偏移量 offset,消息大小 size 和消息 Tag 的 HashCode 值。
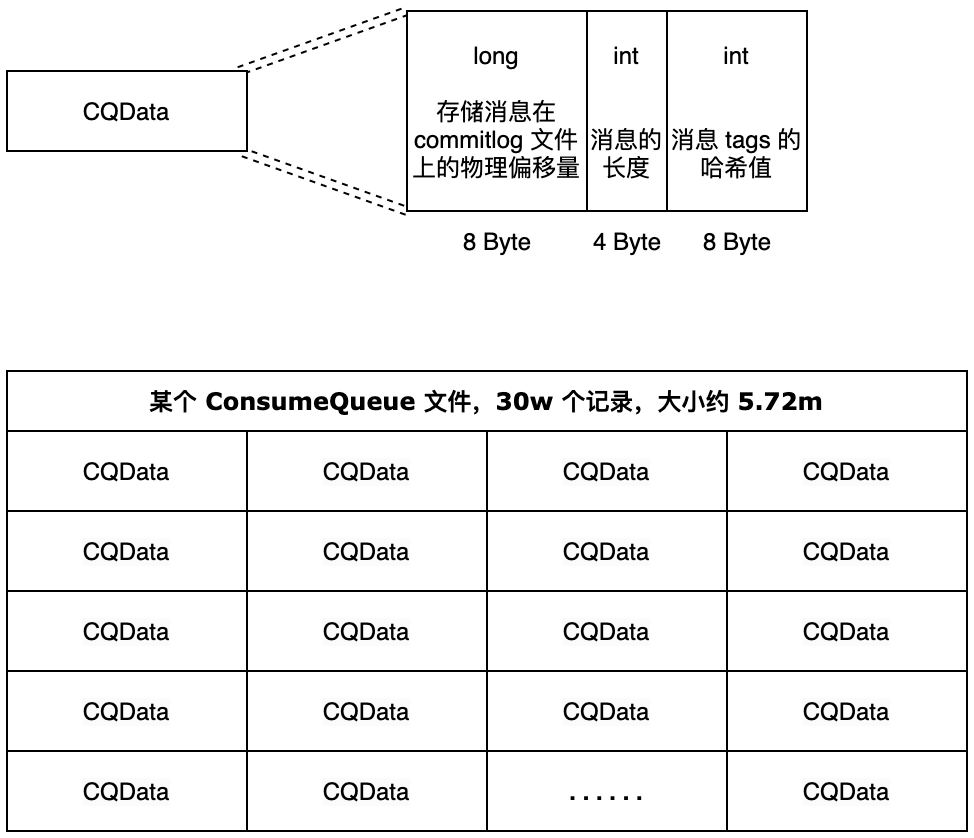
consumequeue 文件可以看成是基于 topic 的 commitlog 索引文件,故 consumequeue 文件夹的组织方式如下:topic/queue/file 三层组织结构,具体存储路径为: $HOME/store/consumequeue/{topic}/{queueId}/{fileName}。同样 consumequeue 文件采取定长设计,每一个条目共 20 个字节,分别为 8 字节的 commitlog 物理偏移量、4 字节的消息长度、8 字节 tag hashcode,存储 tag 的哈希码的原因是为了保证每个条目的长度一致,可以使用类似数组下标快速访问条目。单个文件由 30W 个条目组成,可以像数组一样随机访问每一个条目,每个 ConsumeQueue 文件大小约 5.72M;
消息消费者根据 topic、消息消费进度(ConsumeQueue 逻辑偏移量),也就是第几个 ConsumeQueue 条目,类似数组的索引,这样的消费进度去访问消息,通过逻辑偏移量 logicOffset × 20,即可找到该条目的起始偏移量(ConsumeQueue 文件中的偏移量),然后读取该偏移量后 20 个字节即可得到一个条目,无须遍历 ConsumeQueue 文件。
Index 是什么
Index 是一个哈希索引,主要在方便消息 key 查询时使用,主要是通过 IndexFile 实现的。
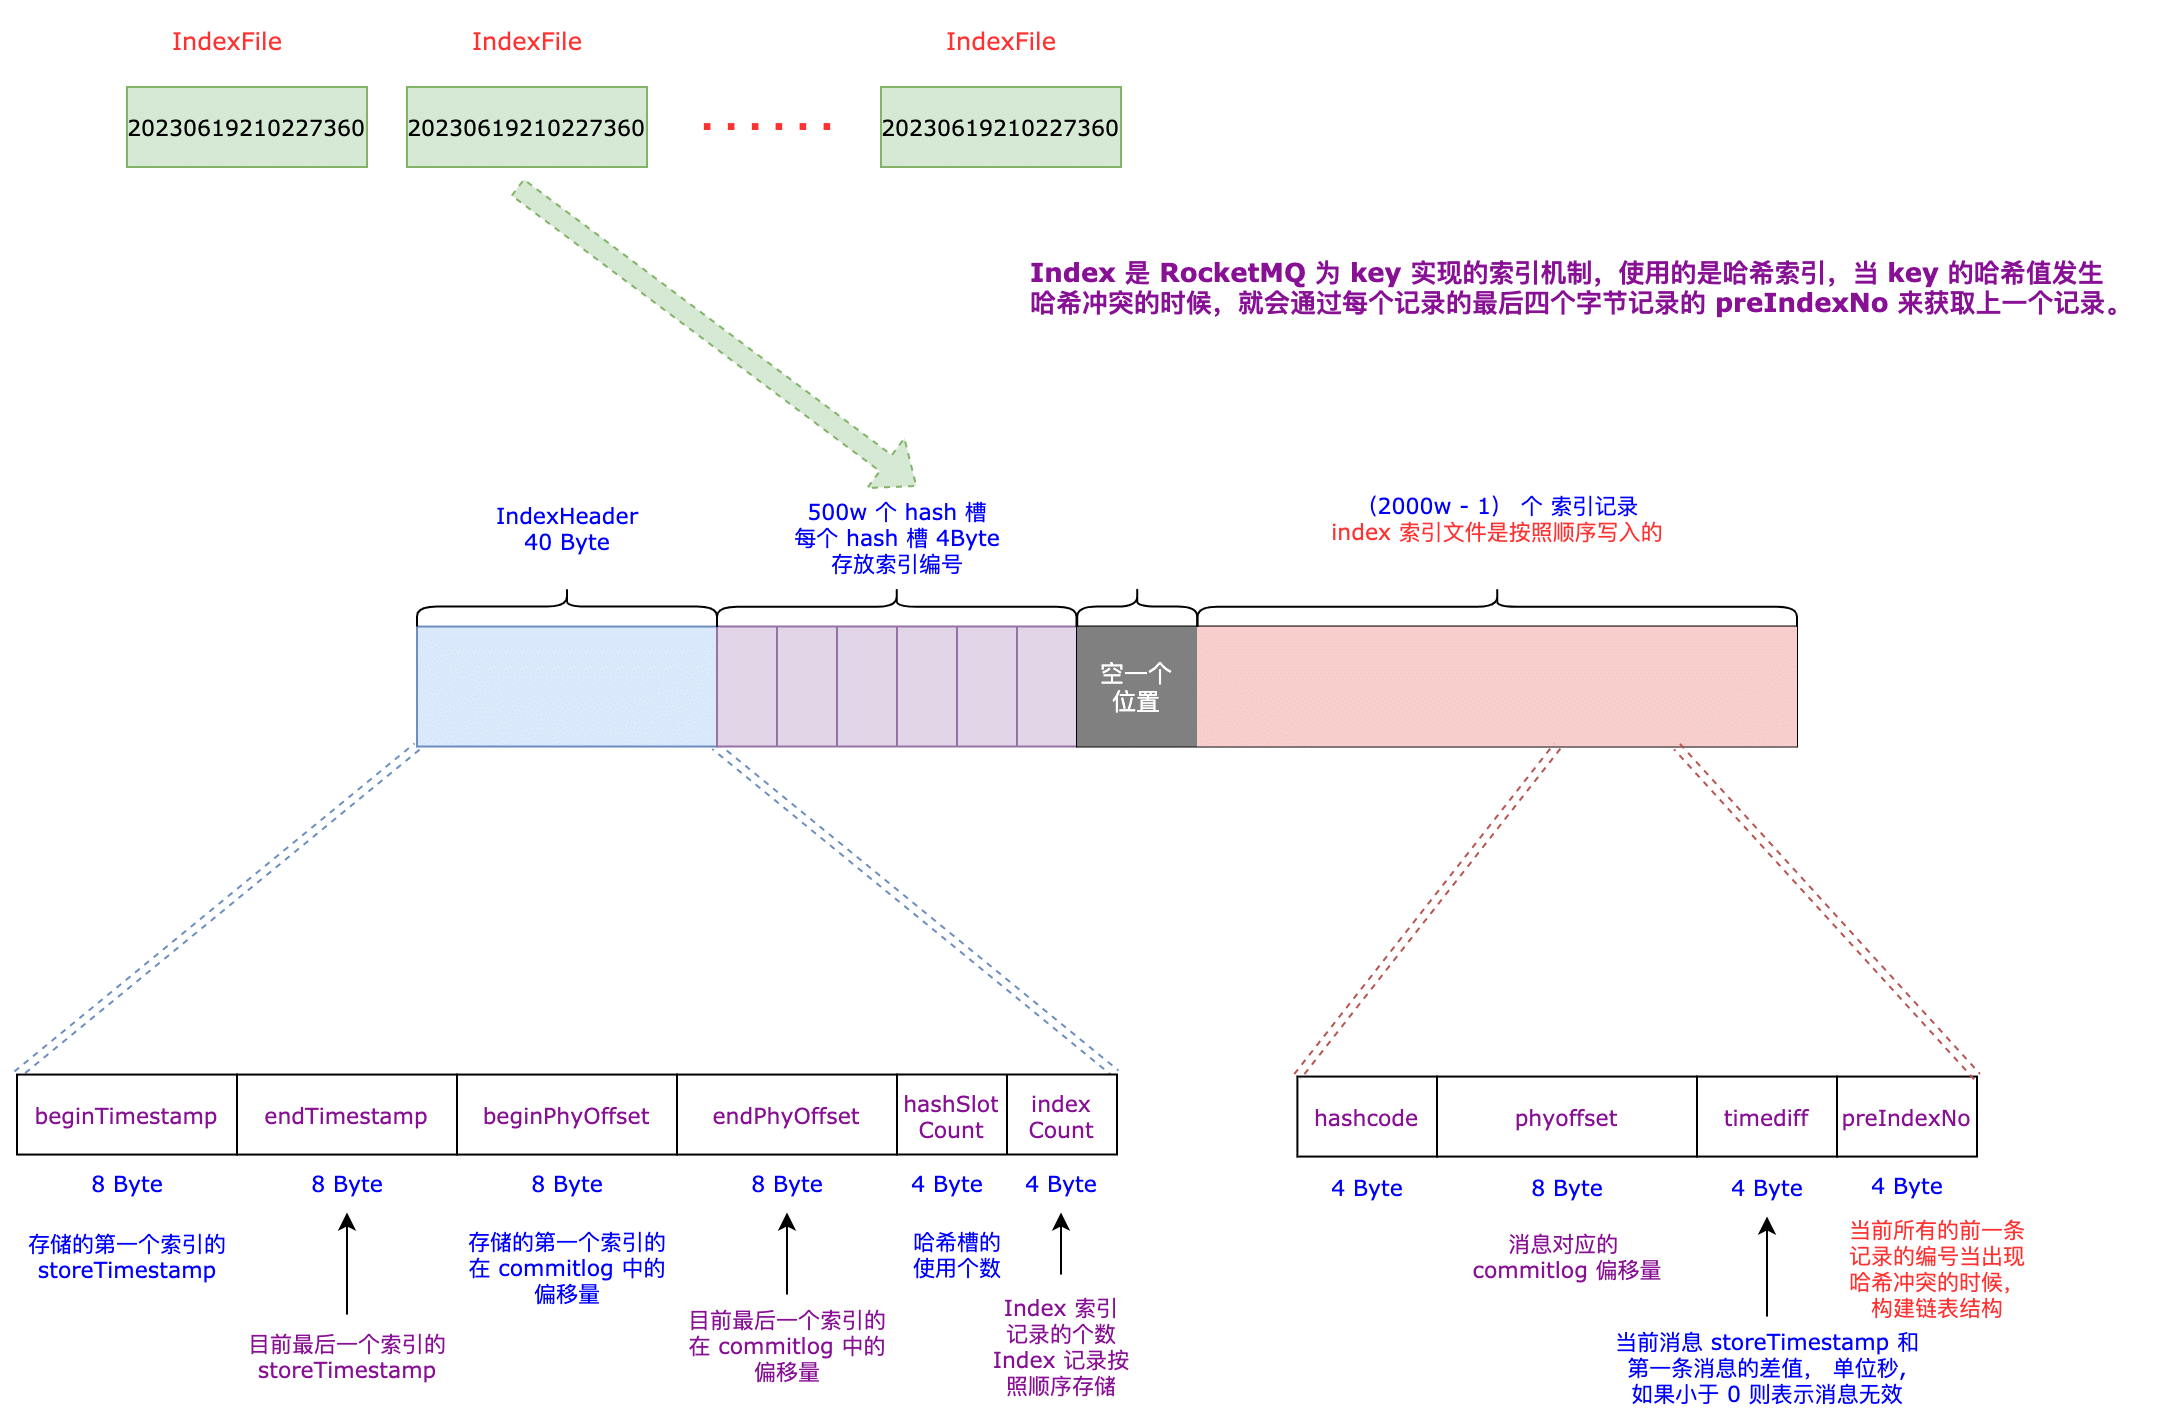
RocketMQ 中有多个 IndexFile,每个 IndexFile 的存储格式如上图所示,主要分为三个部分:
- IndexHeader 头部分:Index 文件头,保存着该文件的一些信息;
- 哈希槽部分:每个 Index 文件默认有 500w 个哈希槽,存放的就是真正的索引记录在当前 Index 文件中的编号,通过编号可以快速定位到索引信息;
- 索引记录部分:(2000w -1)个索引记录,顺序写入,主要存的就是消息在 commitlog 中的物理偏移量;
详细说下这三部分的具体内容
IndexHeader 部分:
- beginTimestamp:第一个添加到该 IndexFile 文件的索引记录对应消息的 storeTimestamp;
- endTimestamp:最后一个添加到该 IndexFile 文件的索引记录对应消息的 storeTimestamp(每次写都会更新);
- beginPhyOffset:第一个添加到该 IndexFile 文件的索引记录对应消息在 commitlog 中的物理偏移量;
- endPhyOffset:最后一个添加到该 IndexFile 文件的索引记录对应消息在 commitlog 中的物理偏移量(每次写都会更新);
- hashSlotCount:当前哈希槽占用个数,有可能会哈希冲突;
- indexCount:当前 IndexFile 文件中,索引记录的个数;
哈希槽部分:这部分就简单了,就是记录当前哈希槽对应的是那一条索引记录,存的是编号,索引记录在 IndexFile 文件在是按照顺序写入的,因为每条索引记录都是定长的,根据编号可以很快的定位到具体的索引记录。
索引记录部分:每个索引记录都是定长的,方便根据编号快速定位
- hashCode:key 的哈希值,存储 key 的哈希值是为了控制每条索引记录的长度一致;
- phyoffset:索引记录内存储 key 对应消息的 commitlog 的地址偏移量;
- timediff:当前索引记录内对应的消息相对第一个添加到该 IndexFile 文件的索引记录对应消息的 storeTimestamp 的时间差值,时间单位是秒。存储差值并且单位是秒的原因是为了尽可能的节约空间;
- preIndexNo:解决哈希冲突使用的,组成一个单向链表的结构;
Index 是如何解决哈希冲突的?
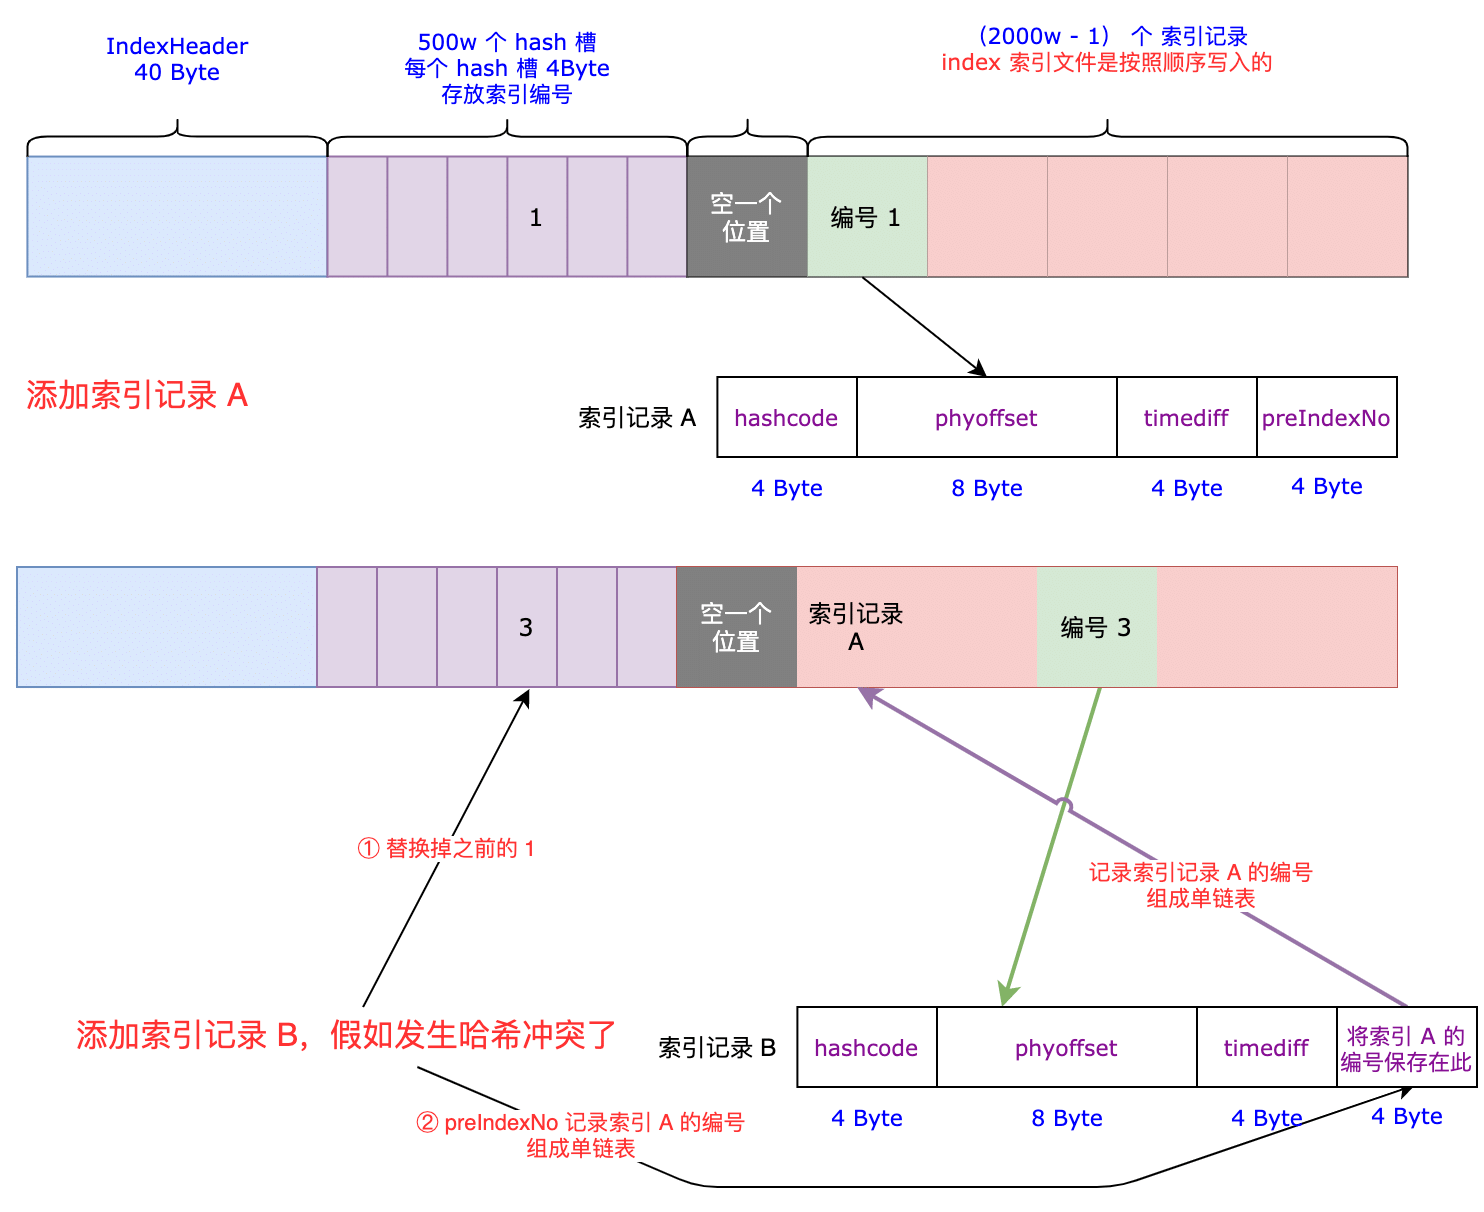
解释一下这个图:
- 通过计算某个 key 的哈希码,命中了哈希槽中的槽 X,然后按照顺序将该索引记录写到 index 文件中,假如此时是写到编号 1 位置;
- 某个时刻添加一个新的 key 的信息,通过计算哈希码发现也命中了槽 X,假如 index 文件顺序写到了编号 3 的位置,此时需要将槽 X 保存的数据由编号 1 改为编号 3,然后将新 key 的索引文件的 preIndexNo 位置写入编号 1,表示发生哈希冲突了,保存的是冲突前的索引记录的编号,这样就形成了链表结构了,查询的时候就可以通过这个 preIndexNo 的编码号去遍历了;
索引文件构建过程
在 DefaultMessageStore 中有个消息分发的服务 ReputMessageService,这个服务就是为了构建 ConsumeQueue 和 Index 文件的。整个消息分发的核心就是 ReputMessageService#doReput 方法,具体就是读取 commitlog 文件,从文件中一个一个的读取一个完整消息,然后调用 ConsumeQueue 和 Index 对应的各自的消息分发处理去构建对应的文件。
ReputMessageService 有一个属性 reputFromOffset,表示当前已经从 commitlog 中分发到了哪一个地址。
// 分发服务已经分发的偏移量
private volatile long reputFromOffset = 0;
接下来核心就是分析 ReputMessageService#doReput 方法,该方法流程很长,分步分析:
消息读取流程
校验消息分发的偏移量是否正常
if (this.reputFromOffset < DefaultMessageStore.this.commitLog.getMinOffset()) {
    log.warn("The reputFromOffset={} is smaller than minPyOffset={}, this usually indicate that the dispatch behind too much and the commitlog has expired.",
        this.reputFromOffset, DefaultMessageStore.this.commitLog.getMinOffset());
    this.reputFromOffset = DefaultMessageStore.this.commitLog.getMinOffset();
}
主要就是用 reputFromOffset 和 commitlog 文件夹中最小的一个物理偏移量做比较,假如 reputFromOffset 比较小,说明可能是太久没有做消息分发了,commitlog 自动过期被删除了,所以此时需要将 reputFromOffset 设置为最小的 commitlog 的地址偏移量。
获取消息分发位置的内存切片
第二步:开启一个 for 循环,通过 reputFromOffset 定位到该偏移量对应的是那个 commitlog,然后获取该位置后面的 commitlog 的内存切片,就去读取该内存切片内的消息了做转发操作了。
// for 循环转发消息
// isCommitLogAvailable() 为 true 表名还有消息需要同步
for (boolean doNext = true; this.isCommitLogAvailable() && doNext; ) {

    // ...... 省略 ......

    // 根据消息转发的偏移量,获取该偏移量在那个 commitlog 文件上,获取该文件的内存映射的切片
    SelectMappedBufferResult result = DefaultMessageStore.this.commitLog.getData(reputFromOffset);
    if (result != null) {
        // ...... 省略真正的消息转发处理 ......
    } else {
        doNext = false;
    }
}
读取消息封装成消息转发对象
第三步:从内存切片中,一个消息一个消息的读取出来,封装成消息转发对象 DispatchRequest。
// for 循环转发消息
// isCommitLogAvailable() 为 true 表名还有消息需要同步
for (boolean doNext = true; this.isCommitLogAvailable() && doNext; ) {

    // ...... 省略 ......

    // 根据消息转发的偏移量,获取该偏移量在那个 commitlog 文件上,获取该文件的内存映射的切片
    SelectMappedBufferResult result = DefaultMessageStore.this.commitLog.getData(reputFromOffset);
    if (result != null) {
        try {
            this.reputFromOffset = result.getStartOffset();

            // 一条消息一条消息的同步
            for (int readSize = 0; readSize < result.getSize() && doNext; ) {
                // 从内存映射文件切片中读取到了一个 dipatch 分发消息
                DispatchRequest dispatchRequest = DefaultMessageStore.this.commitLog.checkMessageAndReturnSize(result.getByteBuffer(), false, false);
                int size = dispatchRequest.getBufferSize() == -1 ? dispatchRequest.getMsgSize() : dispatchRequest.getBufferSize();

                // ...... 省略消息读取结果的处理 ......
        } finally
            result.release();
        }
    } else {
        doNext = false;
    }
}
上面代码的关键就是 CommitLog#checkMessageAndReturnSize(ByteBuffer, boolean, boolean) 这个方法了,这里面就是读取内存切片 ByteBuffer 中的数据,每读取到一个消息就会将其封装为 DispatchRequest 对象。
读取消息是严格按照 commitlog 存储消息的顺序来做的,关于 commitlog 的单个消息的存储数据的格式可以看前面的文章。这里主要说下 checkMessageAndReturnSize 方法的几种情况:
public DispatchRequest checkMessageAndReturnSize(java.nio.ByteBuffer byteBuffer, final boolean checkCRC,
    final boolean readBody) {
    try {
        // 1 TOTAL SIZE
        int totalSize = byteBuffer.getInt();

        // 2 MAGIC CODE
        int magicCode = byteBuffer.getInt();
        switch (magicCode) {
            case MESSAGE_MAGIC_CODE:
                // 正常消息的魔法值
                break;
            case BLANK_MAGIC_CODE:
                // 文件尾
                return new DispatchRequest(0, true /* success */);
            default:
                log.warn("found a illegal magic code 0x" + Integer.toHexString(magicCode));
                // 注意有问题的 magic 值的 size 参数传的是 -1
                return new DispatchRequest(-1, false /* success */);
        }

        //  正常消息才会走到这里,异常情况在 switch...case... 中直接返回了


        // ...... 省略其他 ......
}
这个方法有几种情况,主要关注返回的对象 DispatchRequest 的 size 属性和 success 属性
- 消息读取成功的情况:
- 读到某个 commitlog 文件尾了,先返回出去,后面会获取下一个 commitlog;
- 读到一个正常的消息了,封装 DispatchRequest 返回,等待处理;
- 消息读取失败的情况:
- 消息存储的魔法值有问题;
- 消息虽然读取成功了,但是可能消息的 crc 校验没过,或者读取的消息长度和其本身存储的长度字段的值不同;
消息处理
if (dispatchRequest.isSuccess()) { // 消息读取正常
    if (size > 0) {
        // 如果消息长度大于 0,则调用 doDispatch() 方法去做真正的转发工作
        DefaultMessageStore.this.doDispatch(dispatchRequest);

        // ...... 省略长轮询的消息监听器的处理 ......

        // 更新同步进度,也就是偏移量
        this.reputFromOffset += size;
        readSize += size;

        // ...... 省略统计 ......
    } else if (size == 0) {
        // 读到文件尾了,翻页操作
        this.reputFromOffset = DefaultMessageStore.this.commitLog.rollNextFile(this.reputFromOffset);
        readSize = result.getSize();
    }
} else if (!dispatchRequest.isSuccess()) { // 消息解析失败

    if (size > 0) { // 某个消息读的有问题
        log.error("[BUG]read total count not equals msg total size. reputFromOffset={}", reputFromOffset);
        this.reputFromOffset += size;
    } else {
        doNext = false;
        // If user open the dledger pattern or the broker is master node,
        // it will not ignore the exception and fix the reputFromOffset variable
        if (DefaultMessageStore.this.getMessageStoreConfig().isEnableDLegerCommitLog() ||
            DefaultMessageStore.this.brokerConfig.getBrokerId() == MixAll.MASTER_ID) {
            log.error("[BUG]dispatch message to consume queue error, COMMITLOG OFFSET: {}",
                      this.reputFromOffset);
            this.reputFromOffset += result.getSize() - readSize;
        }
    }
}就看正常的情况吧,DefaultMessageStore.this.doDispatch(dispatchRequest);,核心就是拿读取到的 DispatchRequest 对象去做转发操作了。DefaultMessageStore#doDispatch 的实现如下:
/**
 * 同步消息到 consumeQueue 和 index
 */
public void doDispatch(DispatchRequest req) {
    for (CommitLogDispatcher dispatcher : this.dispatcherList) {
        dispatcher.dispatch(req);
    }
}
在 DefaultMessageStore 的构造方法中,创建了两个 CommitLogDispatcher 类型的对象,他们分别对应的是 ConsumeQueue 和 index 文件的转发器。接下来就依次分析 ConsumeQueue 和 Index 文件是如何构建的。
// 添加消息转发器,构建消息消费队列的转发器和构建索引文件的转发器
this.dispatcherList = new LinkedList<>();
this.dispatcherList.addLast(new CommitLogDispatcherBuildConsumeQueue());
this.dispatcherList.addLast(new CommitLogDispatcherBuildIndex());
ConsumeQueue 构建过程
/**
 *  消息分发,分发到 ConsumeQueue
 */
class CommitLogDispatcherBuildConsumeQueue implements CommitLogDispatcher {

    @Override
    public void dispatch(DispatchRequest request) {
        final int tranType = MessageSysFlag.getTransactionValue(request.getSysFlag());
        switch (tranType) {
            case MessageSysFlag.TRANSACTION_NOT_TYPE:
            case MessageSysFlag.TRANSACTION_COMMIT_TYPE:
                DefaultMessageStore.this.putMessagePositionInfo(request);
                break;
            case MessageSysFlag.TRANSACTION_PREPARED_TYPE:
            case MessageSysFlag.TRANSACTION_ROLLBACK_TYPE:
                break;
        }
    }
}
关键就是 DefaultMessageStore#putMessagePositionInfo 方法
public void putMessagePositionInfo(DispatchRequest dispatchRequest) {
    // 根据消息主题与队列ID,先获取对应的ConsumeQueue文件
    ConsumeQueue cq = this.findConsumeQueue(dispatchRequest.getTopic(), dispatchRequest.getQueueId());
    cq.putMessagePositionInfoWrapper(dispatchRequest, checkMultiDispatchQueue(dispatchRequest));
}
获取或创建 ConsumeQueue
在 DefaultMessageStore 中有 consumeQueueTable 的 Map,从这里就可以看出 ConsumeQueue 是根据 topic 来区分的,然后每个 queueId 对应一个 ConsumeQueue,方便后续 Consumer 来消费消息。
// 消息队列存储缓存表,按照消息主题分组
private final ConcurrentMap<String/* topic */, ConcurrentMap<Integer/* queueId */, ConsumeQueue>> consumeQueueTable;
主要看下 ConsumeQueue 构造方法,因为在消息分发的时候,会先尝试通过 topic 和 queueId 获取对应的 ConsumeQueue,如果不存在就会去创建一个新的 ConsumeQueue。
ConsumeQueue 的构造方法如下:
public ConsumeQueue(
    final String topic,
    final int queueId,
    final String storePath,
    final int mappedFileSize,
    final DefaultMessageStore defaultMessageStore) {
    this.storePath = storePath;
    this.mappedFileSize = mappedFileSize;
    this.defaultMessageStore = defaultMessageStore;

    this.topic = topic;
    this.queueId = queueId;

    String queueDir = this.storePath
        + File.separator + topic
        + File.separator + queueId;

    this.mappedFileQueue = new MappedFileQueue(queueDir, mappedFileSize, null);

    // 申请了 20byte 大小的临时缓冲区
    this.byteBufferIndex = ByteBuffer.allocate(CQ_STORE_UNIT_SIZE);

    // ...... 省略 ......
}
就是创建一个 mappedFileQueue 对象,这个会去做内存映射操作。然后会分配一个临时缓冲区,在插入新的 CQData 时使用,size = 20byte。
追加 ConsumeQueue 的数据
追加 ConsumeQueue 数据 ConsumeQueue#putMessagePositionInfoWrapper,会最大尝试追加 30 次,核心方法就是调用 putMessagePositionInfo 方法,就是去往 ConsumeQueue 的内存映射文件中写入数据了,内部没什么好分析的。我们只要记住
- ConsumeQueue 内存储的每条数据的格式是:每一个条目共 20 个字节,分别为 8 字节的 commitlog 物理偏移量、4 字节的消息长度、8 字节 tag hashcode;
- 每个 topic 和 queueId 对应一个 ConsumeQueue;
public void putMessagePositionInfoWrapper(DispatchRequest request, boolean multiQueue) {
    // 最大重试 30 次
    final int maxRetries = 30;
    // 获取 ConsumeQueue 标记位状态,判断当前是否可写
    boolean canWrite = this.defaultMessageStore.getRunningFlags().isCQWriteable();
    // 循环写入 CQData,最大重试次数 30
    for (int i = 0; i < maxRetries && canWrite; i++) {
        // 获取消息的 tagCode
        long tagsCode = request.getTagsCode();
        // ...... 省略其他处理 ......

        // 参数 1:当前消息物理 offset
        // 参数 2:消息 size
        // 参数 3:tagCode
        // 参数 4:消息逻辑偏移量(ConsumeQueue 内的偏移量,转换为真实的物理偏移量:消息逻辑偏移量 * 20)
        // 正常返回值是 true
        boolean result = this.putMessagePositionInfo(request.getCommitLogOffset(),
            request.getMsgSize(), tagsCode, request.getConsumeQueueOffset());
        if (result) {
            // ...... 省略其他处理 ......
            // checkPoint 记录最后一条 CQData 所归属的 msg 的存储时间
            this.defaultMessageStore.getStoreCheckpoint().setLogicsMsgTimestamp(request.getStoreTimestamp());
                // ...... 省略其他处理 ......
            return;
        } else {
            // ...... 省略异常情况处理 ......
        }
    }

    // XXX: warn and notify me
    log.error("[BUG]consume queue can not write, {} {}", this.topic, this.queueId);
    this.defaultMessageStore.getRunningFlags().makeLogicsQueueError();
}
Index 构建过程
public void buildIndex(DispatchRequest req) {
    // 获取当前索引文件,假如 list 内不存在 file 或者当前 file 写满的话,就创建新的 file
    IndexFile indexFile = retryGetAndCreateIndexFile();
    if (indexFile != null) {
        // 获取所有文件最大的物理偏移量
        // 获取索引文件最后一条消息 offset
        long endPhyOffset = indexFile.getEndPhyOffset();
        DispatchRequest msg = req;
        // 消息主题
        String topic = msg.getTopic();
        // 消息 key
        String keys = msg.getKeys();
        // ...... 省略异常情况 ......

        // ...... 省略消息类型的判断 ......

        // 如果消息的唯一键不为空,则添加到哈希索引中,以便加速根据唯一键检索消息
        if (req.getUniqKey() != null) {
            indexFile = putKey(indexFile, msg, buildKey(topic, req.getUniqKey()));
            // ...... 省略异常情况 ......
        }

        // 构建索引键,RocketMQ支持为同一个消息建立多个索引,多个索引键用空格分开。
        if (keys != null && keys.length() > 0) {
            String[] keyset = keys.split(MessageConst.KEY_SEPARATOR);
            for (int i = 0; i < keyset.length; i++) {
                String key = keyset[i];
                if (key.length() > 0) {
                    indexFile = putKey(indexFile, msg, buildKey(topic, key));
                    // ...... 省略异常情况 ......
                }
            }
        }
    } else {
        log.error("build index error, stop building index");
    }
}
可以看到,RocketMQ 会给消息生成的唯一键 UniqKey,和用户自定义的 key 生成索引。用户可以自定义多个 key,用空格隔开。
追加数据到 Index
追加数据的核心在 IndexFile#putKey 方法:
(1)第一步:计算 key 的哈希值,根据哈希值路由寻址到一个哈希槽,计算该哈希槽在该 Index 文件上的地址偏移量
// 计算哈希值,是个正值
int keyHash = indexKeyHashMethod(key);
// 根据 keyHash 对哈希槽数量取余定位到哈希值对应的哈希槽下标
int slotPos = keyHash % this.hashSlotNum;
// 哈希码对应的哈希槽的物理地址为   IndexHeader(40字节)+ 下标 * 每个哈希槽的大小(4字节)
int absSlotPos = IndexHeader.INDEX_HEADER_SIZE + slotPos * hashSlotSize;
(2)第二步:获取该哈希槽之前存储的数据,用在哈希冲突的时候的,就相当于一个指针指向之前存在这里的索引条目,链表结构。
int slotValue = this.mappedByteBuffer.getInt(absSlotPos);
if (slotValue <= invalidIndex || slotValue > this.indexHeader.getIndexCount()) {
    slotValue = invalidIndex;
}
(3)第三步:计算待存储消息的时间戳与第一条消息时间戳的差值,并转换成秒
// 计算待存储消息的时间戳与第一条消息时间戳的差值,并转换成秒
long timeDiff = storeTimestamp - this.indexHeader.getBeginTimestamp();
timeDiff = timeDiff / 1000;

if (this.indexHeader.getBeginTimestamp() <= 0) {
    timeDiff = 0;
} else if (timeDiff > Integer.MAX_VALUE) {
    timeDiff = Integer.MAX_VALUE;
} else if (timeDiff < 0) {
    timeDiff = 0;
}
(4)第四步:将 key 的哈希值、消息在 commitlog 上的物理偏移量、消息存储的时间戳的差值、哈希槽原本的值(如果发送哈希冲突了,这里就是存的冲突之前的条目的编号了),最后将当前消息的索引编号存到哈希槽里面。
// 计算新添加条目的起始物理偏移量
// 头部字节长度 + 哈希槽数量 × 单个哈希槽大小(4个字节)+ 当前Index条目个数 × 单个Index条目大小(20个字节)。
// 40 + 500w * 4 + 当前Index条目个数 * 20
int absIndexPos =
    IndexHeader.INDEX_HEADER_SIZE + this.hashSlotNum * hashSlotSize
        + this.indexHeader.getIndexCount() * indexSize;

// 依次将 key 哈希、消息物理偏移量、消息时间戳存入MappedByteBuffer。
// 20 个字节
this.mappedByteBuffer.putInt(absIndexPos, keyHash);
this.mappedByteBuffer.putLong(absIndexPos + 4, phyOffset);
this.mappedByteBuffer.putInt(absIndexPos + 4 + 8, (int) timeDiff);
this.mappedByteBuffer.putInt(absIndexPos + 4 + 8 + 4, slotValue);

// 将当前 Index 文件中包含的条目数量存入哈希槽中,覆盖原先哈希槽的值。
this.mappedByteBuffer.putInt(absSlotPos, this.indexHeader.getIndexCount());
(5)第五步:如果 slotValue == invalidIndex,说明没有发生哈希冲突,就需要去增加槽占用个数了。然后增加 Index 索引文件个数,设置 indexHeader 的 endPhyOffset 和 endTimestamp 的指针。
// 条件成立,说明之前的哈希槽的数据是 0,说明之前的哈希槽没有被占用,也就是没有发送哈希冲突
// 那么就将哈希槽占用的计数 + 1
if (invalidIndex == slotValue) {
    this.indexHeader.incHashSlotCount();
}
// 当前文件使用索引条目增加
this.indexHeader.incIndexCount();
this.indexHeader.setEndPhyOffset(phyOffset);
this.indexHeader.setEndTimestamp(storeTimestamp);
索引文件如何使用
ConsumeQueue 的使用
略,会在分析消费者消费消息的时候分析
Index 的使用
Index 作为哈希索引,主要是为了提供查询使用的。主要看一下 IndexFile#selectPhyOffset 查询方法,解析一下这个方法的入参:
List<Long> phyOffsets:存放消息查找结果的容器;String key:待查询的 key,格式就是 topic#key;int maxNum:本次查询允许查询的最多的消息次数;long begin:消息存储的开启时间;long end:消息存储的结束时间;boolean lock:没啥用,这个参数代码中已经注释了,(也不删除,RocketMQ 的代码拉胯);
下面分析如何通过 Index 查找消息在 commitlog 上的地址偏移量,以及如何处理哈希碰撞:
(1)第一步:计算出要查找的 key 的哈希值,以及命中的哈希槽和对应在 IndexFile 文件中的地址偏移量。
// 根据 key 算出 key 的哈希码,keyHash 对哈希槽数量取余,定位到哈希码对应的哈希槽下标
int keyHash = indexKeyHashMethod(key);
// 计算当前 key 命中哈希槽中的下标
int slotPos = keyHash % this.hashSlotNum;
// 计算命中的哈希槽在 IndexFile 文件中的地址偏移量
int absSlotPos = IndexHeader.INDEX_HEADER_SIZE + slotPos * hashSlotSize;
(2)第二步:根据哈希槽的地址偏移量,获取其保存的数据,也就是索引记录在 IndexFile 文件中的编号了。
// 获取哈希槽中原来存储的 index 文件的索引
int slotValue = this.mappedByteBuffer.getInt(absSlotPos);
(3)第三步:校验从哈希槽中获取的索引记录编号,如果该编号无效则什么都不处理。
dex || slotValue > this.indexHeader.getIndexCount()
    || this.indexHeader.getIndexCount() <= 1) {
    // 如果对应的哈希槽中存储的数据小于1或大于当前索引条目个数,表示该哈希码没有对应的条目,直接返回
    // do nothing
} else {
    // ...... 省略有效的处理情况 ......
}
**(4)第四步:如果从哈希槽获取的索引记录的编号是有效的,那么需要校验该索引记录是否在查询的时间范围内。**因为给在写记录的时候 key 可能会存在哈希冲突,前面说过,index 文件解决哈希冲突的方式就是,在发送冲突时在每个索引记录的最后 4 个字节保存上一个索引记录的编号,通过这个编号组成链表结构,这样就可以遍历查找了。
// 因为会存在哈希冲突,所以需要 for 循环依次查询
for (int nextIndexToRead = slotValue; ; ) {
    if (phyOffsets.size() >= maxNum) {
        // 已经到达本次查找最大消息条数,跳出循环
        break;
    }

    // 根据Index下标定位到索引记录的起始物理偏移量,然后依次读取哈希码、物理偏移量、时间戳、上一个条目的Index下标
    int absIndexPos = IndexHeader.INDEX_HEADER_SIZE + this.hashSlotNum * hashSlotSize + nextIndexToRead * indexSize;

    // 依次获取 keyHash、phyoffset、timeDiff、prevIndex 的数据
    int keyHashRead = this.mappedByteBuffer.getInt(absIndexPos);
    long phyOffsetRead = this.mappedByteBuffer.getLong(absIndexPos + 4);
    long timeDiff = (long) this.mappedByteBuffer.getInt(absIndexPos + 4 + 8);
    int prevIndexRead = this.mappedByteBuffer.getInt(absIndexPos + 4 + 8 + 4);

    if (timeDiff < 0) {
        // 如果存储的时间戳小于0,则直接结束查找
        break;
    }

    // 恢复毫秒值
    timeDiff *= 1000L;

    long timeRead = this.indexHeader.getBeginTimestamp() + timeDiff;
    // 校验时间是否匹配
    boolean timeMatched = (timeRead >= begin) && (timeRead <= end);

    if (keyHash == keyHashRead && timeMatched) {
        // 找到了
        phyOffsets.add(phyOffsetRead);
    }

    if (prevIndexRead <= invalidIndex
        || prevIndexRead > this.indexHeader.getIndexCount()
        || prevIndexRead == nextIndexToRead || timeRead < begin) {
        break;
    }

    // 向前查找
    nextIndexToRead = prevIndexRead;
}
索引文件的刷盘
ConsumeQueue 的刷盘
ConsumeQueue 的刷盘是由 FlushConsumeQueueService 后台线程服务处理的。首先看 FlushConsumeQueueService#run 方法:
public void run() {
    DefaultMessageStore.log.info(this.getServiceName() + " service started");
    while (!this.isStopped()) {
        try {
            // consumeQueue 刷盘的等待时间,默认 1 秒钟
            int interval = DefaultMessageStore.this.getMessageStoreConfig().getFlushIntervalConsumeQueue();
            this.waitForRunning(interval);
            this.doFlush(1);
        } catch (Exception e) {
            DefaultMessageStore.log.warn(this.getServiceName() + " service has exception. ", e);
        }
    }
    this.doFlush(RETRY_TIMES_OVER);
    DefaultMessageStore.log.info(this.getServiceName() + " service end");
}
**RocketMQ 中 ConsumeQueue 的默认每隔 1 秒钟去调用 doFlush 方法尝试刷盘。那么看下 doFlush 方法做了什么事情:**主要就是获取所有的 ConsumeQueue,并调用对应的刷盘方法去落盘,强制刷盘的时间间隔是 1 分钟。
private void doFlush(int retryTimes) {
    // 获取每次刷新的脏页数量,默认 2 页
    int flushConsumeQueueLeastPages = DefaultMessageStore.this.getMessageStoreConfig().getFlushConsumeQueueLeastPages();

    if (retryTimes == RETRY_TIMES_OVER) {
        flushConsumeQueueLeastPages = 0;
    }

    long logicsMsgTimestamp = 0;

    // 强制刷盘的时间周期,默认 1 分钟
    int flushConsumeQueueThoroughInterval = DefaultMessageStore.this.getMessageStoreConfig().getFlushConsumeQueueThoroughInterval();
    long currentTimeMillis = System.currentTimeMillis();
    if (currentTimeMillis >= (this.lastFlushTimestamp + flushConsumeQueueThoroughInterval)) {
        this.lastFlushTimestamp = currentTimeMillis;
        // 设置为强制刷盘
        flushConsumeQueueLeastPages = 0;
        logicsMsgTimestamp = DefaultMessageStore.this.getStoreCheckpoint().getLogicsMsgTimestamp();
    }

    ConcurrentMap<String, ConcurrentMap<Integer, ConsumeQueue>> tables = DefaultMessageStore.this.consumeQueueTable;

    // 调用每个 consumerQueue 的刷盘方法
    for (ConcurrentMap<Integer, ConsumeQueue> maps : tables.values()) {
        for (ConsumeQueue cq : maps.values()) {
            boolean result = false;
            for (int i = 0; i < retryTimes && !result; i++) {
                result = cq.flush(flushConsumeQueueLeastPages);
            }
        }
    }

    // ...... 省略 checkpoint 文件的操作 ......
}
Index 文件的刷盘
当一个 Index 文件写满后,会创建一个新的 Index 文件,此时会有一个线程去给旧的 Index 文件做刷盘操作。主要看 IndexService#getAndCreateLastIndexFile 方法:
public IndexFile getAndCreateLastIndexFile() {

    // 省略 ......
    if (indexFile == null) {
        try {
            String fileName =this.storePath + File.separator + UtilAll.timeMillisToHumanString(System.currentTimeMillis());
            // 创建 indexFile 文件
            indexFile = new IndexFile(fileName, this.hashSlotNum, this.indexNum,
                                        lastUpdateEndPhyOffset,lastUpdateIndexTimestamp);
            this.readWriteLock.writeLock().lock();
            this.indexFileList.add(indexFile);
        }

        // 省略 ......

        if (indexFile != null) {
            // 创建新文件后开启一个线程,让前一个文件强制刷盘
            final IndexFile flushThisFile = prevIndexFile;
            Thread flushThread = new Thread(new Runnable() {
                @Override
                public void run() {
                    IndexService.this.flush(flushThisFile);
                }
            }, "FlushIndexFileThread");

            flushThread.setDaemon(true);
            flushThread.start();
        }
    }

    return indexFile;
}